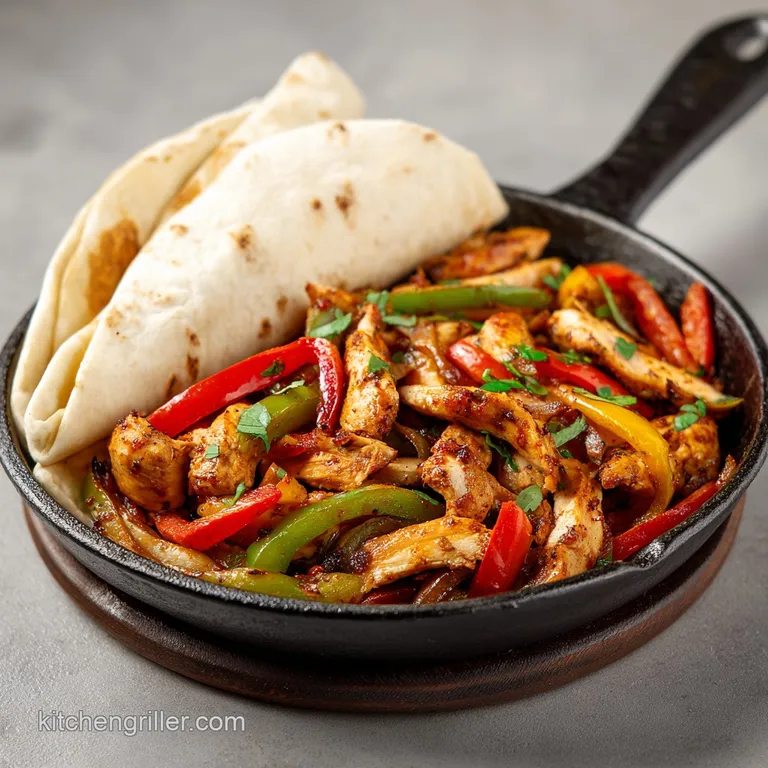
Blackstone Chicken Fajitas: Tender and Caramelized
- Time: Active 15 minutes, Passive 10 minutes, Total 25 minutes
- Flavor/Texture Hook: Smoky, charred, and citrus bright with a satisfyingly crisp pepper crunch.
- Perfect for: Busy weeknight dinners, high protein meal prep, or beginner friendly outdoor entertaining.
- Why Sizzling Blackstone Chicken Fajitas Beat The Restaurant Version
- Why This Recipe Works
- Quick Decision Guide For Perfect Fajita Doneness
- Deep Dive Into The Flavor Chemistry Of Our Components
- The Budget Friendly Building Blocks For These Chicken Fajitas
- Essential Gear For Successful Griddling At Home
- The Step By Step Roadmap To Sizzling Success
- How To Avoid Rubbery Meat And Soggy Peppers
- Adjusting The Batch For Crowds Or Solo Dinners
- Choosing Your Cooking Method Based On Results
- Debunking Common Myths About High Heat Griddling
- Clever Storage Hacks And Using Up Every Scrap
- High in Sodium
- Recipe FAQs
- 📝 Recipe Card
Why Sizzling Blackstone Chicken Fajitas Beat The Restaurant Version
We've all been there. You order fajitas at a restaurant, and they come out on that screaming hot iron skillet, sizzling so loud you can’t hear your friends talk. Then you try to make them at home in a standard frying pan, and it's a disaster.
Instead of that beautiful charred edge, you get a pool of grey liquid at the bottom of the pan. The chicken boils instead of searing, and the peppers turn into a mushy, sad mess. It’s frustrating because you have all the right ingredients, but the physics of the pan just won't cooperate.
The fix isn't a secret sauce or a fancy spice blend; it's all about surface area and heat management. I’ve spent way too many Tuesday nights scrubbing burnt on juice off my stovetop before I finally dragged my cooking outside to the griddle.
Using a Blackstone changes the game because that massive flat top allows moisture to evaporate instantly rather than trapping it under the meat. This is the ultimate weeknight hack for anyone who wants high impact flavor without the cleanup of five different pans.
Trust me, once you see how those onion half moons transform from raw to caramel edged in about four minutes, you’ll never go back to the stovetop. We’re going to focus on a budget smart approach here using basic pantry staples and standard grocery store produce to get results that taste like a $25 plate at a steakhouse.
This recipe is fast, efficient, and honestly, a lot of fun to cook when you've got the spatulas flying.
Why This Recipe Works
- High Surface Evaporation: The wide griddle surface prevents steam from being trapped, ensuring the meat sears rather than boils in its own juices.
- Acid Driven Tenderization: Fresh lime juice breaks down tough muscle fibers during the 15 minute rest, creating a velvety texture in the breast meat.
- Thermal Mass Stability: The thick cold rolled steel plate of the griddle maintains a steady 400°F (204°C), preventing the temperature drop that causes sogginess in thin pans.
- Zone Cooking Control: Separating the vegetables from the protein allows you to manage different cook times while keeping everything hot for a synchronized finish.
Quick Decision Guide For Perfect Fajita Doneness
| Meat Thickness | Internal Temp | Rest Time | Visual Cue |
|---|---|---|---|
| 1/2 inch strips | 165°F (74°C) | 3 minutes | Opaque center with charred edges |
| 3/4 inch strips | 165°F (74°C) | 5 minutes | Firm to touch, no pink remaining |
| 1/4 inch strips | 165°F (74°C) | 2 minutes | Quick curl and dark brown exterior |
Getting the timing right is the difference between a juicy bite and a piece of leather. I usually aim for that half inch slice because it gives you the best ratio of charred exterior to tender interior.
If you find yourself cooking for a bigger crowd, just remember that the griddle temperature might dip slightly when you first dump the meat, so give it an extra minute to recover its heat before you start tossing it around.
Deep Dive Into The Flavor Chemistry Of Our Components
| Ingredient | Science Role | Pro Secret |
|---|---|---|
| Avocado Oil | High Smoke Point | Stays stable at 400°F without turning bitter or smoking out the neighbors. |
| Lime Juice | Protein Denaturant | The citric acid starts "cooking" the exterior of the chicken, allowing spices to penetrate deeper. |
| Smoked Paprika | Flavor Depth | Provides that "outdoor wood fired" taste even if you are using a gas powered griddle. |
| Kosher Salt | Moisture Retention | Draws out surface moisture to help the sear while seasoning the interior through osmosis. |
A quick tip from my kitchen to yours: if you’re looking to save a few bucks, you don't always need the most expensive oils. While I love avocado oil for its stability, a high-quality neutral oil like grapeseed also works wonders here. If you're curious about other over high heat techniques, you might find my Blackstone Hibachi Chicken recipe helpful for understanding how different marinades react to the steel surface.
The Budget Friendly Building Blocks For These Chicken Fajitas
For the Citrus Spice Marinade
- 1/4 cup avocado oil: Why this? Essential for over high heat searing without burning the fats.
- Substitute: Grapeseed oil or refined sunflower oil.
- 2 tbsp fresh lime juice: Why this? Provides the necessary acid to tenderize the chicken strips.
- Substitute: Lemon juice or a splash of apple cider vinegar.
- 1 tsp chili powder: Why this? The base layer of earthy, mild heat.
- Substitute: Ancho chili powder for a sweeter, smokier profile.
- 1 tsp smoked paprika: Why this? Mimics the flavor of a charcoal grill.
- Substitute: Regular paprika plus a drop of liquid smoke.
- 1/2 tsp cumin: Why this? Adds that signature "taco" aroma and depth.
- Substitute: Ground coriander for a brighter, citrusy twist.
- 1/2 tsp garlic powder: Why this? Distributes flavor more evenly than fresh garlic, which can burn.
- Substitute: Granulated garlic or very finely minced fresh cloves.
- 1 tsp kosher salt: Why this? Enhances all other spices and manages moisture.
- Substitute: Sea salt (use slightly less if the grain is very fine).
- 1/2 tsp coarse black pepper: Why this? Adds a sharp, biting heat to the finish.
- Substitute: White pepper for a more subtle heat.
The Main Event
- 1.5 lbs boneless skinless chicken breasts: Why this? Lean protein that cooks quickly and absorbs marinade well.
- Substitute: Chicken thighs for more moisture and a richer flavor.
- 2 large bell peppers (red and green): Why this? Provides sweetness and a colorful crunch.
- Substitute: Poblano peppers for a bit more kick.
- 1 large yellow onion: Why this? Caramelizes beautifully on the griddle.
- Substitute: Red onion for a sharper, more pungent bite.
- 1 tbsp neutral oil: Why this? Prevents sticking when the vegetables first hit the heat.
- Substitute: Canola oil or vegetable oil.
For Serving
- 8 small flour tortillas: Why this? The classic vessel for holding the fillings together.
- Substitute: Corn tortillas for a gluten-free option.
Essential Gear For Successful Griddling At Home
You don't need a professional kitchen, but having the right tools makes this process a breeze. A large flat top griddle like a Blackstone is the star here because it gives you the space to move food around without it piling up.
If you don't have one, a very large cast iron skillet can work, though you’ll likely have to cook in batches to avoid that dreaded steaming effect.
You’ll also want a pair of heavy duty metal spatulas. These aren't just for flipping; they are for "chopping" and moving the food aggressively. The sound of metal on steel is the heartbeat of a good fajita session. Also, an infrared thermometer is a lifesaver.
It lets you know exactly when that surface hits 400°F (204°C) so you aren't guessing. If the surface is too cold, the chicken sticks; if it’s too hot, the spices burn before the meat is done.
The step-by-step Roadmap To Sizzling Success

- Whisk the marinade. In a large bowl, combine the avocado oil, lime juice, chili powder, smoked paprika, cumin, garlic powder, salt, and black pepper. Note: Whisking ensures the salt is fully dissolved and the oil is emulsified with the juice.
- Prep the chicken. Slice the 1.5 lbs of chicken breasts into 1/2 inch strips. Add them to the bowl and coat thoroughly.
- Marinate the meat. Let the chicken sit for 15 minutes at room temperature. Note: This short window is enough for the acid to work without making the meat mushy.
- Heat the griddle. Preheat your Blackstone to medium high heat, until the surface reaches 400°F (204°C).
- Oil the surface. Spread 1 tablespoon of neutral oil across the hot griddle with your spatula.
- Sear the chicken. Place the chicken strips in a single layer on one side of the griddle. Bake 3-4 mins until the bottom is deeply browned.
- Sauté the vegetables. Dump the peppers and onions on the other side. Toss frequently for 6-8 mins until charred and softened.
- The big flip. Use your spatulas to flip the chicken strips. Cook 2-3 mins until the meat is opaque and firm.
- Merge the zones. Use your spatulas to slide the chicken and vegetables together for a final 30 second toss.
- Warm the tortillas. Throw the flour tortillas on the cleared griddle space for 15 seconds per side until they puff slightly and smell toasted.
How To Avoid Rubbery Meat And Soggy Peppers
Why Your Chicken Is Dry And Rubbery
Usually, this happens because of "over manipulation." If you move the chicken the second it hits the griddle, you break the contact between the protein and the heat. This prevents the Maillard reaction that beautiful brown crust from forming.
Without that crust, you end up cooking the meat longer to get color, which dries out the interior. Let it sit! Another culprit is slicing the chicken too thin. If they are like paper, they will overcook before the outside even thinks about browning.
Why Your Vegetables Are Limp And Greasy
This is almost always a temperature issue. If the griddle isn't hot enough, the water inside the peppers and onions leaches out and pools around them. Instead of the water evaporating instantly, the vegetables sit in it and "stew." You want that "sizzle" to be loud and constant.
If the sizzle dies down, stop moving the vegetables and let the griddle heat back up for a minute.
| Problem | Root Cause | Solution |
|---|---|---|
| Chicken sticks to steel | Griddle not hot enough | Wait for 400°F (204°C) before adding meat. |
| Spices smell burnt | Heat is too high | Move food to a cooler zone or kill the flame. |
| Vegetables are raw | Overcrowding the zone | Spread them out in a thinner layer to increase heat contact. |
Common Mistakes Checklist
- ✓ Pat the chicken strips with a paper towel if they seem excessively wet before marinating (though the oil usually handles this).
- ✓ Ensure the griddle is leveled so the oil doesn't all run to one corner.
- ✓ Use two spatulas to toss the vegetables; it's much more efficient than one.
- ✓ Don't skip the 15 minute marinade; it's the secret to that "tender bite" texture.
- ✓ Clean the griddle surface immediately after cooking while it's still warm to make it easier.
Adjusting The Batch For Crowds Or Solo Dinners
When you need to feed a small army, the griddle is your best friend, but you have to be smart about it. For a 2x or 4x batch, don't just dump all the chicken at once. The massive amount of cold meat will tank the surface temperature. Instead, work in batches.
Sear half the chicken, move it to a "warm" zone (a burner set to low), and then do the next half. For the spices, I usually only go to 1.5x the amount of salt and heavy spices like cumin, then taste. Sometimes a full double up can be overwhelming.
If you’re scaling down for one or two people, you can actually do the whole meal on a single burner zone of the Blackstone. Just keep the chicken on one side of the zone and the veggies on the other. Since you’re using less food, it will cook slightly faster because the griddle will stay hotter.
Keep an eye on those peppers; they’ll go from perfect to burnt in a heartbeat when they aren't crowded.
Choosing Your Cooking Method Based On Results
| Method | Time | Texture | Best For |
|---|---|---|---|
| Blackstone Griddle | 10 mins | Maximum char, crisp veggies | Authentic restaurant style results |
| Cast Iron Stovetop | 15 mins | Good sear, softer veggies | Small batches or rainy days |
| Sheet Pan Oven | 25 mins | Evenly cooked, no char | Hands off prep, low effort |
While the griddle is the gold standard for Chicken Fajitas, I know not everyone has one yet. If you're stuck inside, the cast iron skillet is your next best bet. Just make sure you don't crowd it. If you have to cook the chicken in three different goes, do it. It’s better than having one big pan of boiled meat. If you're looking for something with a bit more of a "comfort food" vibe that uses similar ingredients, check out my Southern Stewed Chicken for a slower, heartier approach.
Debunking Common Myths About High Heat Griddling
One thing I hear all the time is that you need to marinate chicken for 24 hours to get flavor. That’s actually a myth for a dish like this. Because we are slicing the chicken into thin 1/2 inch strips, the surface area is massive.
A 15 minute marinade is plenty because the spices are coating almost every millimeter of the meat. In fact, if you leave it in the lime juice for 24 hours, the acid will actually start to turn the chicken mushy and "chalky."
Another misconception is that you need a specialized "fajita seasoning" packet. Honestly, most of those are just salt, cornstarch, and a bit of chili powder. By using individual spices like smoked paprika and cumin, you control the salt levels and the smokiness.
Plus, it’s much cheaper to use what’s already in your cabinet. Finally,, don't believe the idea that you have to use a ton of oil. The griddle is seasoned steel; once it’s hot, the meat will release naturally once the sear is set.
Clever Storage Hacks And Using Up Every Scrap
If you happen to have leftovers which is rare in my house these store beautifully. Put them in an airtight container in the fridge for up to 3 days. When you reheat, don't use the microwave if you can avoid it. It turns the peppers into slime.
Instead, toss them back on a hot skillet for 2 minutes. The chicken will get its snap back and the peppers will firm up. You can also freeze the cooked mixture for up to 2 months, though the texture of the peppers will soften significantly.
Zero waste is the name of the game here. If you have leftover onion ends or pepper tops, don't toss them! Throw them into a freezer bag. Once you have a full bag, you can boil them down for a vegetable stock.
Even the leftover marinade in the bowl can be used just make sure you simmer it in a small saucepan for at least 5 minutes to kill any bacteria from the raw chicken, and you've got a concentrated flavor drizzle for your finished tacos.
It's a great way to ensure every penny of your grocery budget is used effectively.

High in Sodium
912 mg of sodium per serving (40% of daily value)
The American Heart Association recommends limiting sodium intake to less than 2,300mg per day, with an ideal limit of about 1,500mg for most adults.
Tips to Reduce Sodium
-
Halve the Kosher Salt-25%
Reduce the 1 tsp of kosher salt in the chicken marinade to 1/2 tsp. This is a significant source of added sodium.
-
Rinse Canned Vegetables (if applicable)-20%
If you are using canned bell peppers or onions (not specified but a common source), rinsing them under cold water can remove up to 20% of their sodium content.
-
Rely on Spices
Continue to use the chili powder, smoked paprika, cumin, and garlic powder for flavor. Experiment with adding fresh cilantro, a pinch of cayenne pepper, or a dash of your favorite low-sodium hot sauce.
-
Choose Low-Sodium Tortillas-10%
Select low-sodium flour tortillas if available. While the current recipe doesn't specify tortilla sodium, this is a common area for hidden salt.
Recipe FAQs
Is it necessary to marinate the chicken for the full 15 minutes?
Yes, this is essential for the best texture. The 15-minute marinade at room temperature is the secret to achieving that signature tender bite in your chicken strips.
How to ensure the peppers and onions get a good char?
Use two metal spatulas to toss the vegetables frequently on the griddle. This method creates consistent contact with the 400°F surface, ensuring even softening and charring within the 6-8 minute window.
Is it true that I should cook the chicken and vegetables together from the start?
No, this is a common misconception. For the best results, you must spread the chicken in a single layer on one zone while keeping the vegetables on a separate zone to control the moisture release and sear effectively.
How to clean the griddle surface after cooking?
Clean the surface immediately while it is still warm. Doing this while the residual heat remains makes it significantly easier to scrape away any charred bits or leftover marinade before they set.
What is the secret to a perfectly seared crust on the chicken?
Preheat your griddle surface to exactly 400°F. If you enjoyed mastering this high heat sear, you can apply the same principle of surface temperature control to our Blackstone Pollo Asado Burritos for consistently browned results.
How to prevent the chicken strips from sticking to the griddle?
Add 1 tablespoon of neutral oil to the surface before laying down the chicken. Ensuring the griddle is perfectly level also prevents the oil from pooling in one corner, allowing for an even non-stick layer across the entire cooking zone.
Should I pat the chicken dry before marinating?
Yes, use a paper towel to remove excess moisture if the strips seem wet. Removing surface water helps the marinade adhere better to the chicken and ensures the meat sears rather than steams when it hits the hot griddle.
Blackstone Chicken Fajitas

Ingredients:
Instructions:
Nutrition Facts:
| Calories | 638 kcal |
|---|---|
| Protein | 54.2 g |
| Fat | 28.4 g |
| Carbs | 39.6 g |
| Fiber | 4.2 g |
| Sugar | 5.8 g |
| Sodium | 912 mg |
