Beer Can Chicken Recipe with Garlic Roast
- Time: Active 20 minutes, Passive 1 hours 15 mins, Total 1 hours 35 mins
- Flavor/Texture Hook: Shatter crisp skin with velvety, garlic infused interior
- Perfect for: Backyard pitmasters seeking a reliable, low and slow style result on a gas grill
- The Ultimate Beer Can Chicken Recipe with Garlic
- Technical Specifications for the Bird
- The Science of Garlic Ingredients
- Necessary Gear for Success
- Step by Step Precision Method
- Solving Common Cooking Issues
- Creative Flavor Variations
- Storage and Waste Management
- Best Ways to Serve
- Debunking Roasting Myths
- Very High in Sodium
- Recipe FAQs
- 📝 Recipe Card
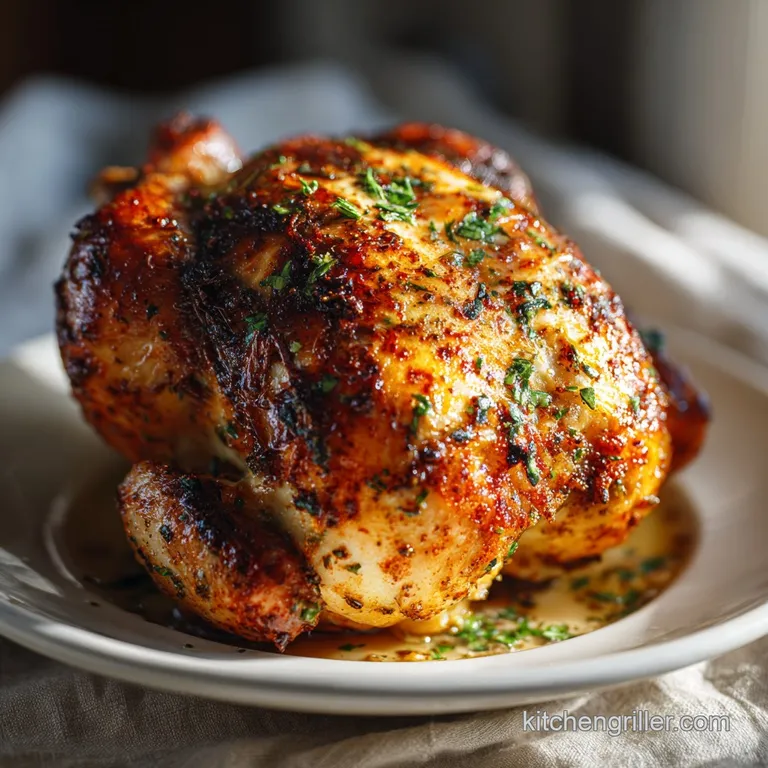
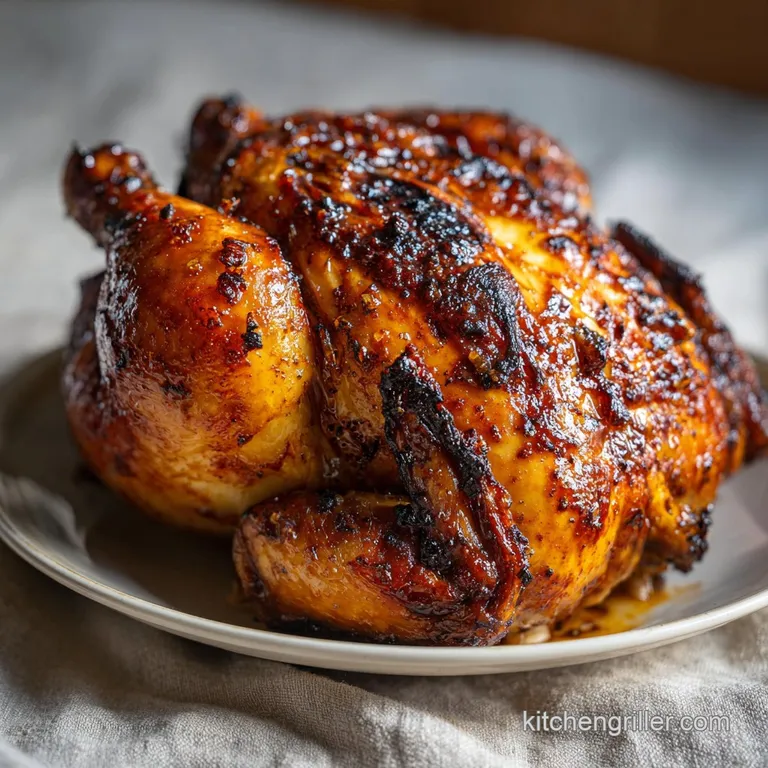
The Ultimate Beer Can Chicken Recipe with Garlic
The sizzle of fat dripping onto a hot deflector plate and the pungent, heavy aroma of toasted garlic filling the backyard is when I know the weekend has actually started. I learned the hard way that balance is everything not just the flavor balance, but the physical balance of the bird.
Years ago, I tried the "free standing" method on a wobbly gas grill, only to have the chicken tip over, extinguishing the burners and creating a beer soaked disaster that took hours to clean.
That laboratory failure taught me the importance of a dedicated holder. This Beer Can Chicken Recipe with Garlic and a Holder for Gas Grill guarantees flavorful, juicy results every time.
We aren't just shoving a can into a bird; we are creating a vertical convection oven that uses steam to hydrate the pectoral muscles while the exterior undergoes a beautiful Maillard transformation.
It takes patience to get that perfect bark, but the results speak for themselves when the skin begins to crackle under your knife.
When you set that bird upright, you are essentially defying the traditional roasting physics that often leave breast meat dry before the thighs are done. This method is the ultimate shortcut to a "pitmaster" quality bird without needing a dedicated smoker.
We are looking for precision in temperature and a slow, steady climb to the finish line.
Technical Specifications for the Bird
The Thermal Lag of Lager: The liquid inside the can stays significantly cooler than the grill air, creating a temperature differential that slows the internal cook of the breast meat. This allows the exterior skin more time to render and crisp up without the meat overcooking.
| Thickness (Breast) | Internal Temp | Rest Time | Visual Cue |
|---|---|---|---|
| 1.5 inches | 160°F | 10 mins | Juices run clear when pierced |
| 2.0 inches | 162°F | 12 mins | Skin is mahogany and taut |
| 2.5+ inches | 165°F | 15 mins | Drumsticks wiggle easily |
Precision is the hallmark of any serious cook, especially when dealing with poultry. Monitoring these numeric checkpoints ensures you don't cross the line from succulent to stringy.
I always pull my bird at 160°F because the carryover heat during the rest period will naturally bring it to the food safe 165°F.
The Science of Garlic Ingredients
In my kitchen laboratory, I’ve found that garlic behaves differently depending on how it’s treated. We are using three layers of garlic here: powder in the rub for over high heat stability, a fresh paste under the skin for deep tissue infusion, and smashed whole cloves in the beer can to aromatize the steam.
Each serves a specific chemical purpose in the final flavor profile.
| Component | Science Role | Pro Secret |
|---|---|---|
| Garlic Powder | Dry heat stability | Does not burn as fast as fresh garlic on the skin |
| Fresh Garlic Paste | Cellular infusion | Sulfur compounds bond with fats in the butter |
| Brown Sugar | Caramalization | Lowers the point where the skin browns (bark formation) |
| Smoked Paprika | Color and Phenols | Provides that authentic BBQ hue without a smoker |
Using fresh garlic versus the pre minced shortcut in a jar makes a massive difference in the potency of the aromatics. Fresh cloves contain higher levels of allicin, which provides that sharp, characteristic bite we want to mellow out during the slow roasting process.
| Ingredient Type | Flavor Impact | Texture Result |
|---|---|---|
| Freshly Smashed Garlic | Vibrant, sharp, complex | Melts into the basting juices |
| Jarred Minced Garlic | Muted, slightly acidic | Can feel gritty if not fully cooked |
While the jarred stuff is convenient, it often sits in a citric acid preservative that can interfere with the subtle sweetness of the brown sugar rub. If you are aiming for an authentic result, take the extra two minutes to smash your own cloves. It is a small investment of time for a massive payoff in the final bite.
Necessary Gear for Success
To execute this Can Chicken Recipe with Garlic and a Holder for Gas Grill properly, your equipment list is short but specific. You’ll need a solid vertical chicken holder this is non negotiable for safety and stability on grill grates.
A standard 12 oz can of lager fits into most holders, acting as the reservoir for our aromatic liquids.
You will also need a reliable digital meat thermometer. When we talk about patience and precision, we are talking about degrees, not minutes. A gas grill can have hot spots that vary by 25°F or more, so checking the internal temperature of the thickest part of the breast is your only true guide.
Finally, a pair of heavy duty tongs and a over high heat grill mitt are essential for moving the bird, as that beer can will be incredibly hot and pressurized with steam.
Chef Tip: Freeze your unsalted butter for 10 minutes before mashing it into the garlic paste. This allows it to stay firm as you work it under the skin, preventing it from melting and running out before you even get the bird onto the grill.
step-by-step Precision Method
- Prepare the dry rub. Combine 2 tbsp brown sugar, 1 tbsp smoked paprika, 1 tbsp garlic powder, 1 tsp onion powder, 1 tsp cayenne pepper, 2 tsp kosher salt, and 1 tsp black pepper in a small bowl. Note: This creates the "bark" or the exterior crust.
- Create the garlic butter paste. Mash 4 minced garlic cloves with 2 tbsp softened butter and 1 tsp chopped thyme until uniform.
- Prep the chicken. Pat the 4 lb whole chicken completely dry with paper towels. Dry skin is the only way to achieve a shatter crisp texture.
- Apply the internal flavor. Loosen the skin over the breast and thighs with your fingers, then slide the garlic butter paste underneath. Note: This protects the meat from drying out.
- Apply the external rub. Coat the entire outside of the bird with the dry rub, pressing it firmly into the skin.
- Prepare the beer can. Open the 12 oz lager, pour out about 1/4 of it, and drop in 3 smashed garlic cloves and a sprig of rosemary.
- Assemble the vertical rig. Place the can into the holder, then lower the chicken onto the can so it’s standing upright.
- Set up the gas grill. Pre heat to 350°F (180°C) using indirect heat. Ensure the burners directly under the chicken are off.
- Roast the bird. Place the chicken on the grill and close the lid. Roast for 1 hours 15 mins until the skin is mahogany and the breast hits 160°F.
- Rest and carve. Carefully remove from the grill and let the bird rest upright for 10-15 minutes before carving.
Solving Common Cooking Issues
One of the biggest hurdles when following a Chicken Recipe with Garlic and a Holder for Gas Grill is managing the skin texture. Sometimes, despite your best efforts, the skin comes out chewy rather than crispy.
This usually happens if the grill temperature drops or if there is too much moisture in the cooking environment.
Problems with Rubbery Skin
If your chicken skin feels like rubber, the fat hasn't had enough heat to render out. This can happen if you are "peeking" too much opening the lid lets all the dry heat escape. Keep the lid closed to maintain that 350°F environment. If you're struggling with this, similar to the technique used in our Smoked Chicken Wings recipe, adding a tiny pinch of baking powder to your rub can help break down the protein in the skin for a better crunch.
Unstable Vertical Setup
If the bird feels top heavy, your holder might be too small for a 4 lb chicken. Always ensure the "tripod" of the two legs and the can creates a stable base. If it wobbles, you can use a small piece of crumpled aluminum foil to shim the bottom of the can within the holder.
| Problem | Root Cause | Solution |
|---|---|---|
| Burnt sugar rub | Grill temp exceeded 375°F | Keep temp strictly at 350°F; move bird further from heat |
| Dry breast meat | Cooked past 165°F internal | Use a thermometer; pull at 160°F and rest |
| Metal taste | Can liner overheated | Ensure you use a holder that shields the can from direct flame |
Common Mistakes Checklist
- ✓ Pat the chicken bone dry before adding the rub (moisture = steam = soggy skin).
- ✓ Never use a full can of beer; it needs headspace to boil and create steam.
- ✓ Ensure the beer is at room temperature so it starts steaming immediately.
- ✓ Avoid putting the rub under the skin; the sugar will burn against the meat.
- ✓ Use indirect heat only direct flame will incinerate the drippings and the rub.
Creative Flavor Variations
If you want to move away from the traditional BBQ profile, you can easily adapt this method. For a brighter, Mediterranean feel, I often swap the smoked paprika for dried oregano and add lemon zest to the butter paste. It creates a profile very similar to my favorite Lemon Garlic Chicken recipe, which is a fantastic alternative if you don't have a whole bird on hand.
- If you want a spicy kick, double the cayenne pepper and add 1 tbsp of hot sauce directly into the beer can.
- If you want an herb forward bird, replace the thyme with a mix of sage, rosemary, and marjoram.
- If you want a deeper color, substitute the brown sugar with dark muscovado sugar for more molasses content.
Storage and Waste Management
You can store leftovers in an airtight container in the fridge for up to 4 days. If you want to freeze it, I recommend shredding the meat first; it stays good for up to 3 months. When reheating, avoid the microwave if you want to keep the skin's integrity a quick 10 minute blast in a 400°F (200°C) oven or air fryer is much better.
Don't you dare throw away the carcass! The real "pitmaster" move is using the bones and the leftover beer garlic liquid from the can to make a rich, smokey stock. Simmer the bones with some onion scraps and celery for 4 hours, and you’ll have a base for soup that tastes like a backyard bonfire in the best way possible.
Best Ways to Serve
This chicken is the star of the show, but it needs the right supporting cast. Because the garlic flavor is so prominent, you want sides that are creamy or acidic to cut through the richness. It pairs beautifully with a Classic Potato Salad recipe, which provides a cool, tangy contrast to the warm, spiced poultry.
I also love serving this with grilled corn on the cob or a simple vinegar based slaw. Since the grill is already hot, you might as well throw some asparagus or bell peppers on the side for the last 15 minutes of the cook.
The beauty of this Beer Can Chicken Recipe with Garlic is that it feels like a feast without requiring a mountain of side dishes to make it feel complete.
Debunking Roasting Myths
One persistent myth is that the beer actually "flavors" the meat significantly. In reality, the beer doesn't have enough aromatic volatile compounds to change the taste of the muscle fibers deeply.
What it does do is provide a constant source of moisture through steam, which prevents the internal cavity from drying out. The flavor comes from your rub and that garlic butter paste you worked under the skin.
Another misconception is that the can might explode. As long as the can is open and not completely full, the pressure will always have an escape route. It is a safe, effective way to roast as long as you use a proper holder and maintain indirect heat on your gas grill.
Patience and physics are your best friends in the kitchen, not folklore.

Very High in Sodium
1190 mg mg of sodium per serving (52% of daily value)
The American Heart Association recommends limiting sodium intake to about 2,300mg per day for optimal health.
Tips to Reduce Sodium in Your Beer Can Chicken
-
Reduce Kosher Salt-25%
Kosher salt is a major contributor to the sodium content. Reduce the amount of kosher salt from 2 tsp (12g) to 1 tsp (6g), or even 1/2 tsp (3g). You can always add more at the table, but it's harder to remove! Taste the chicken after cooking and before adding more salt.
This will reduce your sodium content significantly.
-
Choose Low-Sodium Beer-10%
While beer isn't incredibly high in sodium, some brands contain more than others. Check the nutrition information or opt for a low-sodium beer option for cooking. This simple switch can cut down on the overall sodium content without sacrificing flavor.
-
Emphasize Fresh Garlic-10%
Increase the amount of fresh garlic in the paste. Fresh garlic provides robust flavor without adding any sodium. Since your recipe includes 4 cloves, increase it to 6 or 8 and reduce the amount of garlic powder by half.
-
Omit Garlic/Onion Powder-5%
Consider omitting garlic and onion powder entirely and using fresh garlic and onions instead to help better control sodium and enhance the flavor.
-
Experiment with Herbs
Enhance the flavor with other herbs like oregano, basil, or marjoram. Experiment to find your favorite combination. These fresh herbs will provide wonderful taste without adding any sodium.
Recipe FAQs
What internal temperature signals the chicken is fully cooked?
165°F (74°C). Pull the bird off the heat slightly earlier at 160°F, as the temperature will continue to rise during the mandatory 10-15 minute rest period.
Is it necessary to use a specialized holder, or can the can stand alone?
No, do not rely on the can alone. Using a dedicated holder prevents tipping, which is a major safety hazard on the grill and stops the chicken from falling into the heat source.
How do I ensure the skin gets shatter crisp instead of rubbery?
Pat the entire surface bone dry before applying the rub. Moisture creates steam, which prevents the skin from rendering properly; this focus on dryness is the same principle that ensures good crisping when you utilize the [Way to Grill recipe] for corn.
Does the beer actually infuse the meat with significant flavor?
No, flavor infusion is minimal. The beer primarily generates steam inside the cavity, which keeps the breast meat moist while the exterior rub creates the primary flavor profile.
Why is indirect heat mandatory for this beer can technique?
Indirect heat prevents burning the sugar in the dry rub. Direct flame under the bird will rapidly scorch the sugar and spices before the internal temperature has time to safely rise.
What should I do with the leftover beer and garlic liquid in the can after cooking?
Simmer the liquid with the carcass to create stock. If you are looking for a side dish that balances the richness of this chicken, consider making a bright and tangy [Creamy Cucumber Salad recipe] to serve alongside it.
How should I adjust the cooking time if I use a larger bird, perhaps 6 lbs?
Increase the total roasting time by 20 to 30 minutes. Always rely on the internal temperature probe, as visual cues are unreliable; this focus on temperature precision is the same skill needed for the [Smoked Brisket for recipe] technique.
Garlic Beer Can Chicken

Ingredients:
Instructions:
Nutrition Facts:
| Calories | 518 kcal |
|---|---|
| Protein | 45.6 g |
| Fat | 33.2 g |
| Carbs | 8.8 g |
| Fiber | 0.9 g |
| Sugar | 6.4 g |
| Sodium | 1190 mg |
