Make Ahead One Pot Meal for Camping with Beef Stew

- Time: Active 30 minutes, Passive 1 hours 40 mins, Total 2 hours 10 mins
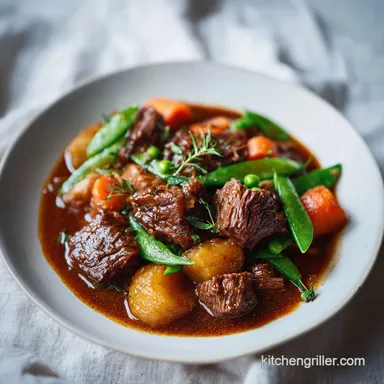
- Flavor/Texture Hook: Unctuous, melt in-the mouth beef with a velvety, wine reduced gravy
- Perfect for: High altitude camping, cold weather expeditions, and stress free campfire dining
- Make Ahead One Pot Meal for Camping with Beef Stew
- Why This Low Braise Works
- Key Recipe Performance Metrics
- Sourcing Your Braising Ingredients
- Essential Gear for Heat Control
- Step-by-Step Production Process
- Fixing Texture and Consistency Issues
- Simple Ingredient Swaps
- Scaling the Recipe
- Myths Regarding Meat Searing
- Storage and Zero Waste Methods
- Finishing and Serving Your Meal
- High in Sodium ⚠️
- Recipe FAQs
- 📝 Recipe Card
make-ahead One Pot Meal for Camping with Beef Stew
The rhythmic thwack of the knife against the cutting board always sets the tone, but it's the high pitched sizzle of beef hitting a ripping hot cast iron surface that really starts the show.
I still remember a trip to the wind whipped canyons of Utah where I tried to cook a stew from scratch over a temperamental campfire. Three hours in, the potatoes were mush, the beef was like chewing on a hiking boot, and we ended up eating granola bars by flashlight.
That failure taught me that the campfire is for finishing and reheating, not for the heavy lifting of a true braise.
This make-ahead one pot beef stew recipe is the perfect camping meal. By handling the complex thermodynamics of collagen breakdown in the controlled environment of your home kitchen, you arrive at the campsite with a flavor dense, nutrient rich base that only needs a gentle simmer to reach peak consistency.
We aren't just making a meal; we're engineering a portable comfort station. The aroma of red wine and thyme wafting through the pines is a total mood shifter after a long day of hiking.
I've spent years obsessing over the physics of the Maillard reaction and how it interacts with different cuts of meat. What we’re looking for here is a "low and slow" masterpiece that survives the freezer and thrives in a Dutch oven over glowing embers.
This approach guarantees that the beef is succulent rather than stringy, and the sauce is a glossy reduction instead of a thin, watery mess. You'll never go back to those salty, dehydrated pouches again once you see how a bit of prep changes the entire outdoor experience.
Why This Low Braise Works
The Physics of Collagen Melting: Sustained heat between 160°F and 180°C transforms tough collagen fibers into gelatin, creating a silky mouthfeel and lubricating the muscle fibers.
Maillard Reaction Maximization: over High heat searing creates hundreds of different flavor compounds that serve as the structural foundation for the entire stew’s profile.
Retrogradation and Thickening: Cooling the stew overnight allows the starches from the Yukon Gold potatoes to stabilize, which results in a thicker, more cohesive gravy upon reheating.
Osmotic Flavor Penetration: The resting period allows the seasoned liquid to move back into the meat fibers through osmosis, ensuring the beef is seasoned to the core.
| Beef Cube Size | Internal Temp | Braise Time | Visual Cue |
|---|---|---|---|
| 1.5 inch cubes | 195°F - 205°F | 1 hr 50 mins | Meat pulls apart with a fork |
| 1.0 inch cubes | 195°F - 205°F | 1 hr 25 mins | Surface appears dark and glossy |
| 2.0 inch cubes | 195°F - 205°F | 2 hr 15 mins | Heavy steam and deep browning |
Understanding the thermal mass of your pot is crucial when transition from a kitchen range to a campfire. The heavy iron of a Dutch oven retains heat much more efficiently than stainless steel, which is why it’s the gold standard for this make-ahead One Pot Meal for Camping with Beef Stew.
When you reheat this at the site, that stored energy ensures even bubbling without the aggressive hotspots that lead to scorching.
Key Recipe Performance Metrics
| Ingredient | Science Role | Pro Secret |
|---|---|---|
| Beef Chuck | Collagen Source | Choose a piece with heavy white marbling for maximum succulence. |
| Red Wine | Acidic Catalyst | The acidity helps break down tough protein bonds while adding tannic depth. |
| Yukon Gold | Starch Stability | These waxy tubers hold their shape better than Russets during the freeze thaw cycle. |
| Tomato Paste | Umami Anchor | Browning the paste (pinçage) creates a caramelized, savory foundation for the broth. |
Using the right cut of beef is non negotiable for a successful make-ahead One Pot Meal for Camping with Beef Stew. I prefer a 1.5 kg beef chuck roast because it has the exact ratio of fat to connective tissue needed for a long simmer. If you're looking for other hearty outdoor options, you might also enjoy the robust flavors found in this Cowboy Stir Fry recipe, which handles high heat beautifully.
Sourcing Your Braising Ingredients
To execute this recipe properly, you need to be specific about your components. Don't just grab "stew meat" from the grocery store; those packs are often a mix of different muscles that cook at different rates.
- 1.5 kg beef chuck roast: Why this? Contains high collagen levels that turn into silky gelatin during the braise.
- 30 ml high smoke point oil: Why this? Prevents acrid smoke during the over high heat searing phase.
- 10 g kosher salt: Why this? Large crystals allow for even distribution and better moisture draw out.
- 5 g cracked black pepper: Provides a sharp, floral heat that cuts through the fat.
- 2 large yellow onions: These provide the aromatic sweetness as they melt into the sauce.
- 4 cloves garlic: Smashed to release oils, then minced for even integration.
- 30 g tomato paste: Why this? Concentrates the umami and acts as a natural thickener.
- 250 ml dry red wine: Use a Cabernet or Merlot for the best tannic structure.
- 750 ml low sodium beef bone broth: Why this? Bone broth adds extra gelatin for a richer mouthfeel.
- 500 g Yukon Gold potatoes: Their buttery texture survives the reheating process.
- 300 g carrots: Adds a natural sugar to balance the wine's acidity.
- 2 stalks celery: Provides the essential savory base (mirepoix).
- 3 sprigs fresh thyme & 2 bay leaves: The classic woodsy aromatics for any beef stew.
Chef's Tip: Freeze your tomato paste in 1 tablespoon portions on a piece of parchment paper. Once solid, toss them in a bag. It's way better than letting half a can go fuzzy in the fridge.
Essential Gear for Heat Control
Having the right tools makes the difference between a burnt pot and a velvety stew. At home, you'll want a heavy bottomed pot, but for the campsite, a seasoned 6 quart cast iron Dutch oven is the only way to go. It distributes heat from a campfire or a propane stove with much more precision than thin camping pots.
You will also need a high-quality thermometer to check your meat's progress. While we cook by time, checking the internal temperature of a beef cube can tell you exactly when the collagen has fully denatured. A sturdy set of long handled tongs is also vital for the searing phase to keep your hands away from the oil splatter. If you're planning a full weekend of prep, consider adding a Sausage and Egg recipe to your meal plan for the next morning.
step-by-step Production Process
Phase 1: The Maillard Sear
Pat the 1.5 kg of beef cubes completely dry with paper towels. Note: Moisture is the enemy of browning; any water will steam the meat instead of searing it. Season generously with the kosher salt and pepper.
Phase 2: Developing the Crust
Heat the 30 ml of oil in your pot over medium high heat until it shimmers. Add the beef in batches, ensuring there is space between each piece. Sear for 3 minutes per side until a dark, mahogany crust forms.
Phase 3: The Aromatic Base
Remove the beef and add the chunky diced onions. Cook for 5 minutes until translucent and slightly browned at the edges. Add the minced garlic and tomato paste, stirring constantly for 2 minutes until the paste turns a deep rust color.
Phase 4: Deglazing the Fond
Pour in the 250 ml of dry red wine. Use a wooden spoon to scrape up all the brown bits (the fond) from the bottom of the pot. Note: This is where the most intense flavor lives.
Phase 5: The Braise Initiation
Return the beef to the pot along with any accumulated juices. Add the 750 ml of bone broth, thyme, and bay leaves. Bring to a gentle simmer never a rolling boil.
Phase 6: Adding the Vegetables
Once simmering, add the 500 g of potato cubes, 300 g of carrots, and sliced celery. Cover the pot with a tight fitting lid.
Phase 7: The Slow Cook
Lower the heat to maintain a very soft bubble. Cook for 1 hours 50 mins until the beef is tender and the vegetables are soft. Check the liquid level halfway through; if it looks low, add a splash more broth.
Phase 8: The Cooling Cycle
Remove the pot from the heat and let it sit uncovered for 30 minutes. Note: Cooling it slowly prevents the meat from "shocking" and becoming tough.
Phase 9: Packing for Travel
Transfer the cooled stew to heavy duty freezer bags or airtight containers. If freezing, lay the bags flat to save space in your cooler.
Phase 10: The Campfire Finish
At the campsite, empty the stew into your Dutch oven. Add 100 ml of water or broth to loosen the gravy. Heat over medium embers for 20 minutes until piping hot and bubbling.
Fixing Texture and Consistency Issues

Why Your Stew Liquid Thins
Sometimes, after freezing and reheating, the sauce might lose its viscosity. This usually happens if the potatoes haven't released enough starch or if too much condensation was trapped in the bag.
The solution is simple: mash two or three of the cooked potato cubes directly into the sauce. The released starch acts as a natural emulsifier, bringing the liquid back to a velvety state without the need for a flour slurry.
| Problem | Root Cause | Solution |
|---|---|---|
| Tough Meat | Under cooked collagen | Simmer for an additional 20 mins with the lid on |
| Salty Gravy | Excessive reduction | Add a splash of water or a pinch of brown sugar |
| Mushy Carrots | Cut too small | Cut carrots into 1 inch thick rounds for future batches |
Common Mistakes Checklist
- ✓ Never crowd the pan during the searing phase; work in three batches if necessary.
- ✓ Ensure the wine is fully reduced by half before adding the broth to remove the raw alcohol "bite."
- ✓ Don't skip the deglazing step; those brown bits are the source of all savory depth.
- ✓ Let the stew cool completely before sealing it to prevent ice crystals from forming.
- ✓ Always use a waxy potato like Yukon Gold; Russets will disintegrate into a grainy paste.
Simple Ingredient Swaps
| Original Ingredient | Substitute | Why It Works |
|---|---|---|
| Red Wine (250 ml) | Extra Beef Broth + 1 tbsp Balsamic | Provides the necessary acidity without the alcohol. |
| Beef Bone Broth | Mushroom Broth | Adds an earthy, savory flavor profile. Note: Slightly less body than bone broth. |
| Yukon Gold Potatoes | Parsnips or Turnips | Excellent low carb options that provide a similar texture. |
If you are looking for a lighter alternative to beef for your next trip, you should definitely check out this Turkey Burger Recipe. They are incredibly easy to prep ahead and satisfy that craving for a grilled meal without the long braising time.
Scaling the Recipe
Reducing the Batch
If you're only cooking for two, you can easily halve the ingredients. Use a smaller pot to ensure the liquid level still covers the meat. Reduce the initial cook time by about 15 minutes, as the smaller thermal mass will reach temperature faster.
When halving the egg (if used in a side), just whisk it and use half by volume.
Feeding a Crowd
To double this for a large group (12 servings), use 3 kg of beef and 1.5 L of broth. Do not double the salt and spices immediately; start with 1.5x and adjust at the end. You'll likely need to sear the meat in 5-6 batches to maintain the pan temperature.
Use a massive stockpot and ensure you have enough cooler space to transport the increased volume.
Myths Regarding Meat Searing
Myth 1: Searing seals in the juices. This is scientifically false. Searing actually causes the surface of the meat to lose moisture more rapidly due to the high heat.
However, we do it for the Maillard reaction the chemical reaction between amino acids and reducing sugars that gives browned food its distinctive flavor. The flavor trade off is well worth the minor moisture loss at the surface.
Myth 2: You must use expensive wine for stew. While you shouldn't use something you wouldn't drink, the subtle nuances of a $50 bottle will be lost during a 2 hour braise. A decent, mid range dry red is perfect. Avoid "cooking wines" sold in grocery stores, as they are loaded with unnecessary salt.
Storage and Zero Waste Methods
Storage Guidelines: In the refrigerator, this stew will stay fresh for up to 4 days. If you are freezing it for a trip, it will maintain peak quality for 3 months.
Always label your bags with the date and "REHEAT THOROUGHLY." When transporting to the campsite, keep the stew in a high-quality cooler surrounded by ice. It can actually act as an ice pack for your other perishables!
Zero Waste Tips: Don't throw away your onion skins or celery tops during the prep phase; toss them into a bag in the freezer to make your own broth later. If you have leftover stew at the campsite, it makes an incredible filling for a "pudgy pierogi" or a breakfast hash.
Simply strain the solids, fry them up with an egg, and use the leftover gravy as a dipping sauce for crusty bread.
Finishing and Serving Your Meal
Once your make-ahead One Pot Meal for Camping with Beef Stew is bubbling over the fire, the final touches make all the difference. I always pack a small container of fresh parsley or chives to sprinkle on top right before serving. The hit of fresh chlorophyll brightens the deep, heavy flavors of the braise.
A thick slice of sourdough bread is the ultimate tool for "swiping the bowl." If you want to get fancy, a dollop of horseradish cream or a squeeze of fresh lemon juice can cut through the richness of the beef fat. Sitting around the fire with a bowl of this velvety stew is the pinnacle of outdoor living.
It’s warm, it’s scientific in its execution, and it’s exactly what the body needs after a day in the elements.

High in Sodium ⚠️
915 mg 915mg of sodium per serving (40% 40% of daily value)
The American Heart Association recommends limiting sodium intake to about 2,300mg per day.
Tips to Reduce Sodium in Your Beef Stew:
-
Broth Swap-30%
Replace the low-sodium beef bone broth with no-salt added beef broth. This will significantly reduce the sodium content.
-
Salt Control-25%
Reduce the amount of kosher salt by half, from 10g to 5g. Taste and adjust after cooking, if needed, instead of salting throughout the cooking process. You can add salt at the very end, if necessary, to your liking.
-
Homemade Paste-20%
Use a homemade tomato paste, if possible, or look for a no-salt added tomato paste option. Commercial tomato paste can be surprisingly high in sodium.
-
Flavor Boost
Enhance the stew's flavor with additional fresh or dried herbs and spices. Experiment with smoked paprika, garlic powder, onion powder, or a pinch of cayenne pepper. These will provide depth without adding sodium.
Recipe FAQs
Can I prepare this beef stew completely in advance?
Yes, you absolutely should. The stew is designed to be fully cooked at home up to three days ahead, or frozen for three months. Allowing it to cool completely post cook deepens the flavors through osmotic penetration.
How should I pack the cooked stew for safe cold storage during a camping trip?
Transfer cooled stew into heavy duty, airtight containers or freezer bags. If freezing, lay bags flat to maximize cooler space and maintain an even temperature. Keep it surrounded by block ice for the best results.
What are the best meats for a campfire stew like this?
Beef chuck roast is the superior choice. It contains the necessary high collagen content which breaks down into gelatin during the long, slow braise, yielding a melt-in-your mouth texture that tougher cuts cannot match.
What food should I premake for camping to minimize effort at the fire?
Braise heavy meals like this stew, chilis, or pulled pork are ideal pre-makes. These items require low, sustained heat for texture development, which is difficult to manage consistently over an open flame.
How do I ensure the beef is tender when reheating the stew over the campfire?
Reheat slowly over medium embers, not high flames, for about 20 minutes. Add a small amount of extra liquid to prevent scorching the bottom layer, which is essential for maintaining the velvety gravy achieved through proper slow cooking.
Is it necessary to sear the beef if I am going to braise it for two hours anyway?
No, searing does not seal in juices, but it is mandatory for flavor development. Searing creates the Maillard reaction, which builds hundreds of savory flavor compounds that form the foundation of the stew’s profile.
If I want a heartier version, what recipe pairs well with a rich beef stew?
A side of crusty bread or biscuits is perfect for sopping up the gravy. For a more robust meal, consider prepping something that pairs well with slow cooked meat, like our Poor Man's Burnt recipe, if you want more tender beef flavor profiles.
make-ahead Beef Stew For Camping
Ingredients:
Instructions:
Nutrition Facts:
| Calories | 812 calories |
|---|---|
| Protein | 52 g |
| Fat | 53 g |
| Carbs | 26 g |
| Fiber | 4 g |
| Sugar | 6 g |
| Sodium | 915 mg |
