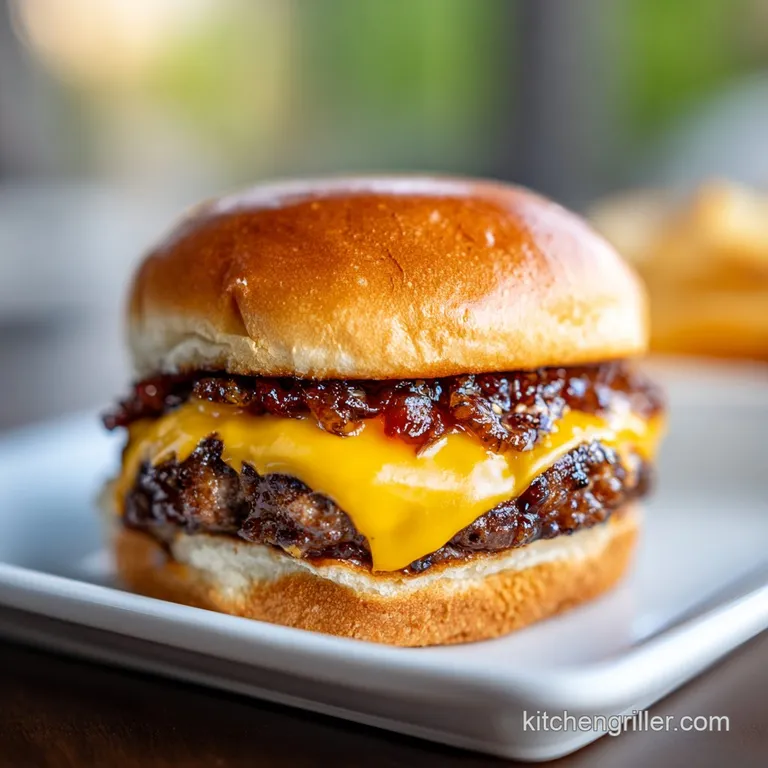
Juicy Lucy Burger Recipe Oven Baked: Flowing Cheddar Core
- Time: Active 20 minutes, Passive 15 minutes, Total 35 minutes
- Flavor/Texture Hook: Crusty umami exterior with a volcanic, flowing cheddar core
- Perfect for: Bold weeknight dinners or indoor entertaining for burger enthusiasts
- Master the juicy lucy burger recipe oven baked
- Why This High Heat Method Wins
- Essential Timing and Temperature Benchmarks
- Gathering Bold Elements for the Base
- Tools for Achieving a Crusty Finish
- Executing the Flawless Double Seal Technique
- Solving the Common Cheese Leak Crisis
- Bold Fusion and Spicy Flavor Twists
- Maximizing Flavor in Your Leftover Prep
- Staging the Reveal for Maximum Impact
- Critical in Sodium
- Recipe FAQs
- 📝 Recipe Card
Master the juicy lucy burger recipe oven baked
The first time I bit into a Minneapolis style burger, it wasn't just a meal; it was a sensory hazard. I remember that initial geyser of molten cheese hitting the back of my throat - it was salty, sharp, and life changing.
I spent months trying to replicate that volcanic core without a charcoal grill because, let's be real, some Tuesdays just don't involve outdoor fire.
This is how we get that bold, crusty exterior and a velvety cheese center using just your oven. We're talking high octane flavor and zero bland moments. You'll get that over high heat sizzle effect and a center that stays liquid gold, all while keeping your kitchen smoke free.
I've made the mistake of using meat that was too lean, which turned my burgers into dry hockey pucks. I've also had the dreaded "cheese blowout" where the center escapes like a slow motion car crash on the baking sheet.
Today, we're fixing all of that with a double seal method that keeps the heat exactly where it belongs.
Why This High Heat Method Wins
Many people think you need a cast iron skillet and a lot of smoke to get a decent burger, but the oven offers a level of thermal control that is hard to beat. By using a wire rack over a sheet pan, we create a convection like environment where hot air circulates entirely around the meat.
This prevents the burger from sitting in its own rendered fat, which often leads to a soggy bottom.
The salt and Worcestershire sauce in this recipe work together to modify the protein structure. This isn't just about taste; it's about physics. The salt dissolves a portion of the muscle proteins, which then cross link during the mixing process. This creates a tighter "net" that holds in the moisture, much like the technique I use in my Turkey Burger Recipe.
- Thermal Insulation: The ground chuck blankets the cheddar, slowing heat transfer so the meat browns before the cheese fat breaks.
- Maillard Maximization: High oven temperatures trigger protein browning on all sides simultaneously, creating a savory crust without flipping.
- Fat Retention: The 80/20 fat ratio ensures that even as the cheese melts, the surrounding meat remains lubricated and tender.
| Patty Thickness | Internal Temp | Rest Time | Visual Cue |
|---|---|---|---|
| 1 inch | 160°F (71°C) | 5 minutes | Fat bubbles clear, cheese is fluid |
| 1.5 inches | 165°F (74°C) | 7 minutes | Exterior is dark brown and firm |
| 0.75 inch | 155°F (68°C) | 4 minutes | Light sizzle, edges are crispy |
Essential Timing and Temperature Benchmarks
Getting the internal temperature right is the difference between a velvety center and a solid block of cold cheese. We are aiming for a specific window where the meat is fully cooked through to a safe 160°F (71°C) while the cheese has fully liquified into that iconic lava state.
| Ingredient | Science Role | Pro Secret |
|---|---|---|
| Ground Chuck | Fat Matrix | 80/20 ratio provides the necessary lipids for a shatter crisp crust. |
| Worcestershire | Protein Binder | Acids help tenderize the beef while deep umami notes ground the flavor. |
| Smoked Paprika | Color Catalyst | Accelerates the visual browning in the oven while adding a grill like aroma. |
Selecting your cheese is equally vital for this oven baked juicy lucy recipe. You want a sharp cheddar that has a high fat content but enough structure to stay together during the initial heating phase. Avoid "low-fat" options at all costs; they will turn rubbery and ruin the experience.
Gathering Bold Elements for the Base
For the ultimate flavor profile, every component must be high impact. We don't do bland in this kitchen. The 2 lbs of ground chuck is the foundation, and it needs to be cold when you work it. If the fat starts to melt from the heat of your hands, you lose that juicy texture.
- 2 lbs ground chuck (80% lean / 20% fat) Why this? Essential fat content for moisture and crust development.
- 1 tbsp Worcestershire sauce Why this? Provides the umami depth and salt for protein binding.
- 1 tsp smoked paprika Why this? Mimics the flavor of a charcoal flame.
- 1 tsp garlic powder
- 1 tsp onion powder
- 1.5 tsp kosher salt
- 1 tsp cracked black pepper
- 4 oz sharp cheddar cheese, cut into 1/2 inch thick squares
- 4 brioche buns
- 2 tbsp unsalted butter, melted
| Original Ingredient | Substitute | Why It Works |
|---|---|---|
| Ground Chuck | Ground Wagyu | Higher fat content; results in an even richer, more velvety bite. |
| Sharp Cheddar | Pepper Jack | Similar melting point with a bold, spicy kick from the peppers. |
| Brioche Buns | Potato Rolls | Maintains a soft, pillowy texture that absorbs the beef juices well. |
If you find yourself missing an ingredient, don't sweat it too much. Just ensure that whatever cheese you choose has a similar moisture profile to cheddar. A very dry cheese like parmesan won't give you that liquid core you're looking for.
Tools for Achieving a Crusty Finish
To get that restaurant quality finish, you need more than just a flat pan. I always use a rimmed baking sheet lined with aluminum foil for easy cleanup, but the real secret is the wire cooling rack.
By elevating the meat, you allow the 400°F (200°C) air to hit the bottom of the patty, creating a 360 degree sear.
Chef's Tip: Freeze your cheese squares for 10 minutes before stuffing. This delay in melting ensures the cheese doesn't liquefy and leak out before the meat has formed its final structure.
You'll also want a solid mixing bowl glass or stainless steel is best to keep the meat cold. Avoid plastic if possible, as it can hold onto odors from previous meals. A digital meat thermometer is your best friend here; guessing the temperature of a stuffed burger is a recipe for disappointment.
Executing the Flawless Double Seal Technique

- Preheat and Prep: Set your oven to 400°F (200°C). Line a baking sheet with foil and place a wire rack on top.
- Season the Beef: In a large bowl, combine the 2 lbs of ground chuck with 1 tbsp Worcestershire, smoked paprika, garlic powder, onion powder, salt, and pepper.
- Divide and Shape: Gently divide the meat into 8 equal portions. Flatten each into a very thin patty, about 4 inches wide. Note: Keeping them thin allows for a better meat to cheese ratio.
- The Cheese Core: Place a 1 oz square of cheddar (1/2 inch thick) in the dead center of 4 patties.
- The Double Seal: Top the cheese laden patties with the remaining 4 meat disks. Pinch the edges firmly, then roll the sides on your palm to create a smooth, seamless edge.
- Chill Phase: Place the prepared patties in the fridge for 15 minutes. Until the meat feels firm and cold to the touch. This prevents the fat from rendering too quickly.
- The Bake: Place patties on the wire rack. Bake for 15 minutes until the exterior is mahogany brown and sizzling.
- Bun Toasting: Brush the brioche buns with melted butter. Place them in the oven for the last 2 minutes of cooking until the edges shatter when pressed.
- The Rest: Remove burgers from the oven. Let them sit for 5 minutes. Note: This is non negotiable; it lets the cheese stabilize so it doesn't explode when you bite.
- Final Assembly: Place the patty on the toasted bun, add your favorite spicy toppings, and serve immediately.
This sealing method is quite similar to the construction used in a Classic Smash Burger recipe, where edge work determines the final texture. The goal is a unified piece of meat that acts as a pressurized vessel for the cheese.
Solving the Common Cheese Leak Crisis
The most frustrating part of a juicy lucy burger recipe oven is seeing all that glorious cheddar pooling on the baking sheet. This usually happens because the edges weren't sealed properly or the meat was overworked, causing it to shrink and tear.
If you see a small leak, don't panic; it usually means the burger is close to done.
Why Your Meat Cracked
Cracking usually occurs when the beef is too lean or if you didn't use a binder like Worcestershire or salt. The protein fibers need that "glue" to stay elastic as the cheese expands. If the meat is too dry, it will simply pull apart under the pressure of the steam inside.
Why the Center is Cold
If the cheese hasn't melted, your patties were likely too thick or your oven wasn't properly preheated. The 400°F (200°C) temperature is crucial because it drives heat into the center rapidly while the exterior crisps.
| Problem | Root Cause | Solution |
|---|---|---|
| Cheese Blowout | Weak edge seals | Crimp edges twice and chill before baking to set the shape. |
| Dry Meat Wall | Overcooked exterior | Use 80/20 chuck and trust the 15 minute timer at high heat. |
| Soggy Bun | Steam trapped | Always use a wire rack and toast the buns with melted butter. |
- ✓ Use cold hands and cold meat to prevent fat melting during prep
- ✓ Crimp the edges like a pie crust to ensure a mechanical lock
- ✓ Let the meat rest for exactly 5 minutes to allow juices to redistribute
- ✓ Use a wire rack to ensure the bottom of the burger gets crispy
- ✓ Avoid pressing down on the burgers with a spatula while they bake
Bold Fusion and Spicy Flavor Twists
For a Spicy Kick
Mix a teaspoon of minced chipotle in adobo into the beef mixture. Replace the sharp cheddar with habanero jack cheese. This creates a "Fire Lucy" that hits with heat from both the meat and the molten core.
For a "Blue Lucy" Twist
Stuff the center with a mix of gorgonzola and cream cheese. The cream cheese helps the blue cheese melt into a velvety sauce rather than just turning oily. This pairs beautifully with a balsamic glaze and arugula.
| Method | Time | Texture | Best For |
|---|---|---|---|
| Oven Baked | 15 minutes | Evenly browned, juicy | Large batches, zero smoke |
| Stovetop | 10 minutes | Very charred, smokier | Single servings, high crust |
| Air Fryer | 12 minutes | Extra crispy edges | Quick lunches, small portions |
If you want a different flavor profile altogether, you could even use the seasoning base from my Homemade Black Bean recipe, though you'd have to be very careful with the moisture levels to prevent a mess in the oven.
Maximizing Flavor in Your Leftover Prep
Storing a stuffed burger is tricky because the cheese will solidify again. You can keep these in the fridge for up to 3 days in an airtight container. When you're ready to eat, don't just throw it in the microwave; that's how you get rubbery beef.
Instead, wrap it loosely in foil and heat it at 350°F (180°C) for about 8 minutes.
For freezing, it's best to freeze the patties raw. Shape them, seal them, and place them on a tray to flash freeze for 2 hours before moving them to a freezer bag. They'll stay fresh for 2 months. Bake them directly from frozen, just add about 5-7 minutes to the cooking time.
To reduce waste, any leftover cheese scraps can be melted into a spicy cheese sauce for fries. The beef trimmings (if you have any) are great for adding to a morning hash or even a quick pasta sauce.
Staging the Reveal for Maximum Impact
When you serve these, the presentation is all about the "reveal." Don't cut them in the kitchen! Bring them out whole on a wooden board. The brioche should have a distinct shine from the melted butter, and the meat should look dark and intensely seasoned.
For the most dramatic effect, slice the burger in half right in front of your guests. If you've timed the rest correctly, the cheese should slowly ooze out like thick lava rather than spraying everywhere. It's a high impact moment that proves why this method is superior to a standard cheeseburger.
Pair these with something acidic to cut through all that fat think spicy pickles, a vinegar based slaw, or even a sharp kimchi. The contrast between the rich, velvety cheese and the bright, crunchy toppings is what makes this meal feel like a restaurant experience in your own home.
Trust me, once you master the double seal, you'll never go back to boring burgers again.

Critical in Sodium
1440 mg mg of sodium per serving (63% of daily value)
The American Heart Association recommends limiting sodium intake to 2,300mg per day for overall health.
Tips to Reduce Sodium in Your Burger:
-
Reduce Added Salt-25%
The recipe uses 1.5 tsp of kosher salt. Try reducing it to 0.75 tsp, or even eliminating it entirely to significantly lower the sodium content. Taste and adjust as needed.
-
Lower Sodium Cheese-15%
Sharp cheddar cheese is a significant source of sodium. Consider swapping it for a lower sodium cheese option like Swiss or Monterey Jack, or use a smaller quantity. This simple swap can make a big difference.
-
Lower Sodium Worcestershire-15%
Worcestershire sauce can be high in sodium. Use a low-sodium Worcestershire sauce or substitute with a blend of equal parts balsamic vinegar and soy sauce (use very sparingly). Start with a small amount and taste.
-
Homemade Buns-10%
store-bought brioche buns can contribute to the overall sodium content. Baking your own allows for complete control over ingredients. Alternatively, check nutrition labels for low-sodium bun options.
-
Spice It Up!
Enhance the flavor with sodium free herbs and spices such as fresh rosemary, thyme, oregano, or red pepper flakes. These additions will boost the taste without adding sodium.
Recipe FAQs
How do you make juicy burgers in the oven?
Use a wire rack over a baking sheet. Elevating the patty allows 400°F air to circulate completely around the beef, creating an all-side sear while preventing the bottom from stewing in rendered fat.
How to cook a juicy lucy burger?
Seal the cheese core firmly within two thin meat layers. Create two thin patties, place cheese in the center of one, top with the second, and crimp the edges tightly to create a pressurized pocket before baking at high heat.
What is the 5 6 7 rule for burgers?
No, there is no universal 5-6-7 rule for oven baked Juicy Lucys. The critical measurement is internal temperature; aim for 160°F (71°C) for medium well, which ensures the meat is safe while the cheese remains molten.
What's the secret to a great Juicy Lucy?
The secret is chilling the patty before baking and using a high fat beef. Chilling for 15 minutes sets the seal so the cheese doesn't leak, and the 80/20 fat ratio lubricates the meat while the crust develops.
Can I use pre-formed frozen burger patties instead of fresh ground beef?
No, you must form them fresh around the cheese. Pre-formed patties rarely seal properly, leading to cheese blowout; you need to custom shape the meat to encapsulate the center completely, similar to sealing dough around a filling.
Why does my cheese always leak out into the pan?
Your edge seal was likely incomplete or the meat wasn't cold enough. When forming, pinch the edges multiple times to create a strong barrier, and remember to chill the fully assembled patties for at least 15 minutes prior to placing them in the hot oven.
What cheese melts best for this oven recipe?
Sharp cheddar is recommended for flavor and texture stability. It has enough fat content to flow nicely without immediately turning oily, and its strong flavor stands up well to the seasoned beef. If you enjoyed mastering the flavor intensity here, see how the same principle of bold flavor layering works in our Creamy Coleslaw Recipe for a perfect side.
Oven Baked Juicy Lucy Burger

Ingredients:
Instructions:
Nutrition Facts:
| Calories | 892 kcal |
|---|---|
| Protein | 52 g |
| Fat | 58 g |
| Carbs | 28 g |
| Fiber | 1.5 g |
| Sugar | 5 g |
| Sodium | 1440 mg |
