Mini Finger Sandwiches: Elegant Tea Party Food
- Time: Active 30 minutes, Passive 0 minutes, Total 30 minutes
- Flavor/Texture Hook: A velvety spread meeting the crisp snap of English cucumber.
- Perfect for: High end urban brunches, gallery openings, or chic afternoon tea.
- Crafting Vibrant Mini Finger Sandwiches for Modern Parties
- The Architecture of a Mess Free Bite
- Selecting Elements for a Balanced Platter
- Component Analysis
- Tools for Surgical Precision in Slicing
- Mastering the Layering and Slicing Technique
- Solving Common Texture and Structure Issues
- Troubleshooting Common Issues
- Adapting Flavors for Different Dietary Needs
- Myths About Finger Sandwiches
- Storage and Sustainability for Busy Cooks
- High Contrast Garnish and Plating Strategy
- Recipe FAQs
- 📝 Recipe Card
Crafting Vibrant Mini Finger Sandwiches for Modern Parties
I remember standing in my sun drenched urban kitchen, prep table overflowing with fresh herbs, trying to get ready for a last minute rooftop gathering. I had bought this beautiful, high-quality Pullman loaf, but in my haste, I layered the cucumbers directly onto the bread.
By the time my friends arrived, those once elegant triangles had turned into a sad, damp mess. It was one of those "home cook humble pie" moments that taught me everything I know now about the structural integrity of a sandwich.
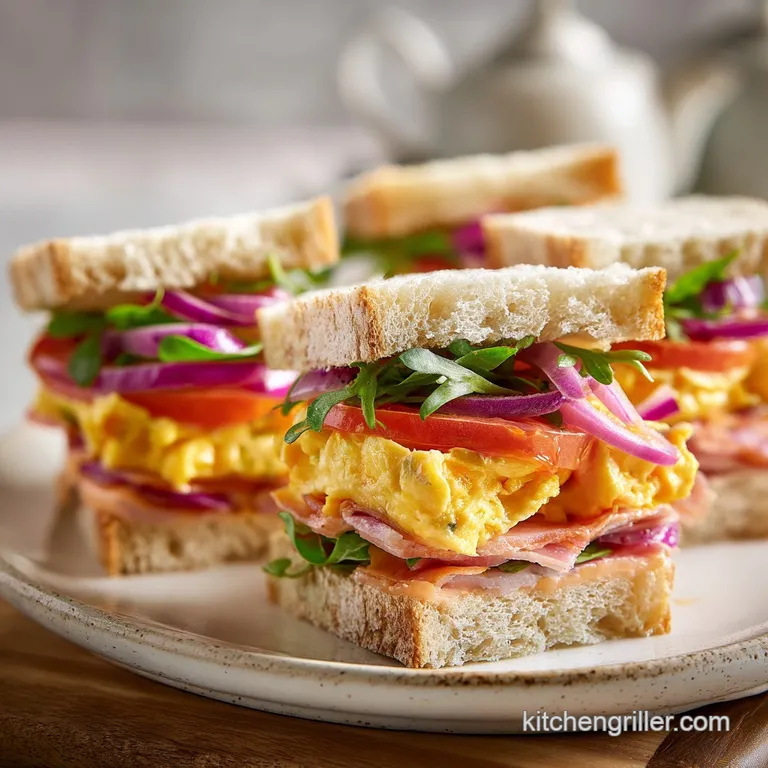
Now, whenever I whip up a batch of Mini Finger Sandwiches, I think about that snap. You know the one? It’s that precise moment when your teeth break through the pillowy bread and hit the crisp, refrigerated cucumber or the briny pop of a caper.
To get that, you need more than just ingredients; you need a strategy. We’re talking about vibrant colors, urban flair, and the kind of "shatter crisp" freshness that makes people reach for a third or fourth piece without even thinking.
The beauty of these little bites lies in the balance of the "city chic" aesthetic and the comforting flavors we grew up with. Whether it's the neon green of fresh chives or the deep, moody orange of smoked salmon against dark pumpernickel, we are building a palette as much as a meal.
Trust me, once you master the "fat barrier" and the "stack and slice" method, you’ll never look at a loaf of bread the same way again.
The Architecture of a Mess Free Bite
The Physics of the Fat Barrier: By applying a thin, edge to edge layer of softened butter or cream cheese, you create a hydrophobic seal on the bread's surface. This barrier prevents the water molecules in the vegetables or egg salad from migrating into the starch structure of the bread, which is exactly how we prevent the dreaded "soggy bottom."
| Servings | Bread Required | Filling Volume | Prep Time |
|---|---|---|---|
| 10 People | 1/2 Loaf White, 1/2 Loaf Wheat | 1.5 Cups Total | 15 minutes |
| 20 People | 1 Loaf White, 1 Loaf Wheat | 3 Cups Total | 25 minutes |
| 30 People | 1.5 Loaf White, 1.5 Loaf Wheat | 4.5 Cups Total | 35 minutes |
When you are planning your spread, think about the environment. If it's a warm day on a balcony, you want higher fat content in your spreads to keep them stable. If you are serving these indoors with a side like my Grilled Sweet Potatoes recipe, you can afford to go a bit lighter on the spreads.
Selecting Elements for a Balanced Platter
To create that vibrant, urban look, we need to be picky about our components. We aren't just making lunch; we are designing an experience. The choice of pumpernickel vs. white bread isn't just about taste it's about the visual drama of the dark and light layers.
For the Foundation
- White Pullman Bread: Use 1 loaf. It's the gold standard because of its uniform square shape and tight crumb.
- Pumpernickel or Whole Wheat: 1 loaf. The earthy, dark tones provide the perfect backdrop for the bright pink salmon.
- Unsalted Butter: 0.5 cup, softened. This is your primary moisture shield.
For the Fillings (The Classic and the Gourmet)
- English Cucumber: 1 large, sliced thin. These have fewer seeds and thinner skin, providing a better "snap."
- Cream Cheese: 4 oz, softened. The "glue" for your herb fillings.
- Fresh Dill & Lemon Zest: 1 tbsp dill, 0.5 tsp zest. This adds the high notes that cut through the fat.
- Hard boiled Eggs: 4 large, grated. Grating the eggs creates a velvety texture that stays put better than chopped eggs.
- Mayonnaise & Curry Powder: 3 tbsp mayo, 0.5 tsp curry. The curry provides a warm, golden hue and a subtle urban kick.
- Smoked Salmon: 4 oz. high-quality slices are essential for that luxurious mouthfeel.
- Capers & Horseradish: 2 tbsp capers, 1 tsp horseradish. These provide the "bite" that balances the smoky fish.
Chef's Tip: Freeze your butter for just 10 minutes before you plan to use it if your kitchen is warm. It should be "plastic" pliable enough to spread but cool enough not to soak into the bread immediately.
Component Analysis
| Ingredient | Science Role | Pro Secret |
|---|---|---|
| English Cucumber | Structural Crunch | Salt the slices and pat dry to remove 20% of their water before assembly. |
| Grated Egg | Emulsion Stability | Grating creates more surface area for the mayo to "grip," preventing the salad from sliding. |
| Lemon Zest | Flavor Volatility | The oils in the zest provide a scent driven "freshness" that juice alone cannot match. |
Because we are working with fresh, cold ingredients, the temperature of your kitchen matters. If you're working in a small city apartment that gets hot quickly, keep your fillings in the fridge until the very second you are ready to spread.
This isn't just about safety; it's about maintaining that firm, velvety texture that makes a gourmet sandwich stand out.
Tools for Surgical Precision in Slicing
You don't need a professional kitchen, but you do need the right sharp objects. In my urban kitchen, space is at a premium, so I rely on a few versatile pieces of equipment that handle the delicate nature of these sandwiches without crushing them.
- Serrated Bread Knife: This is non negotiable. A straight blade will compress the bread, destroying the airy crumb. You want a knife that "saws" through the crusts.
- Mandoline Slicer: For the cucumber. If you want those perfectly translucent slices that look like stained glass, a mandoline is your best friend. Just use the guard I’ve learned that lesson the hard way!
- Offset Spatula: This is the secret to an even, edge to edge spread. It gives you much better control than a standard butter knife.
- Damp Paper Towels: To cover the sandwiches while you work. This prevents the bread from drying out and curling at the edges.
When you're ready to plate, think about the surface. A slate board or a bright white ceramic platter helps the colors pop. If you're serving these alongside a heavier dish like my Smoked Meatloaf Recipe, a simple wooden board provides a nice rustic urban contrast.
Mastering the Layering and Slicing Technique

- Prepare the moisture shield. Spread 0.5 cup of softened butter across all slices of the Pullman and pumpernickel bread. Ensure you reach the very edges. Note: This creates the waterproof barrier we discussed.
- Mandoline the cucumber. Slice 1 English cucumber into paper thin rounds. Place them on paper towels and sprinkle with a pinch of flaky sea salt. Wait 5 minutes for moisture to bead.
- Mix the herbed cream cheese. Combine 4 oz cream cheese, 1 tbsp minced dill, and 0.5 tsp lemon zest. Spread this over the buttered white bread slices.
- Build the egg salad. Mix 4 grated hard boiled eggs with 3 tbsp mayonnaise, 0.5 tsp curry powder, and 1 tsp snipped chives. The mixture should look vibrant and golden.
- Assemble the salmon layer. On the pumpernickel slices, spread a thin layer of cream cheese mixed with 1 tsp horseradish. Layer 4 oz of smoked salmon on top, then sprinkle with 2 tbsp drained capers.
- Stack the layers. Place the cucumber rounds over the herbed cream cheese, overlapping them slightly like fish scales. Top with another slice of buttered bread.
- The "Chill" Factor. Wrap the assembled (but uncut) sandwiches tightly in plastic wrap and refrigerate for at least 20 minutes. This firms up the butter and helps the layers bond.
- Remove the crusts. Using a serrated knife, slice the crusts off all four sides in one smooth motion. Note: Do not press down; let the saw action do the work.
- The Precision Cut. Slice each large square into three rectangular "fingers" or four small triangles. Clean the knife blade between every single cut to ensure the fillings don't smear across the bread.
- Garnish for impact. Add a tiny sprig of dill or a single caper to the top of each sandwich until the platter looks like a curated gallery display.
| Feature | Fast Method | Classic Method |
|---|---|---|
| Crust Removal | Cut before filling (faster but messy) | Cut after assembly (cleaner edges) |
| Cucumber Prep | Direct slice | Salt and pat dry (prevents sogginess) |
| Chilling | Skip | 20 minute chill (better structure) |
Solving Common Texture and Structure Issues
Even with the best intentions, things can go sideways. The most common heartbreak in the world of Mini Finger Sandwiches is the "sliding filling." This usually happens when there is too much moisture or the layers aren't compressed.
Troubleshooting Common Issues
| Issue | Solution |
|---|---|
| Why Your Bread is Tearing | If you try to spread cold butter on soft Pullman bread, the bread will lose the fight every time. The butter must be truly "room temp" around 20°C. If it’s too cold, you’ll end up with holes in your f |
| How to Stop Cucumber Leaking | Cucumbers are basically 95% water. If you don't salt them and pat them dry, that water has nowhere to go but into your bread. Think of it as "sweating" the cucumber. Give them five minutes on a towel, |
| Why Sandwiches are Sliding Apart | This is usually a "too much mayo" problem. If the filling is too loose, it acts like a lubricant between the bread slices. Use the grated egg technique; the finer texture creates more friction and hol |
Adapting Flavors for Different Dietary Needs
If you're hosting a crowd in a modern city like London or New York, you’re bound to have some dietary requests. Converting these is simpler than you’d think.
For a gluten-free version, look for a GF loaf with a tight crumb structure. Many GF breads are quite holy (literally), so you may need to double down on the cream cheese to fill those gaps. If you're looking for a sweet brunch alternative to serve with these, my Blackstone Cinnamon Rolls recipe is a fantastic crowd pleaser that balances the savory notes of the sandwiches.
Scaling the Recipe
- Downsizing (1/2 batch): Use the same proportions but be careful with the curry powder. Spices can become overwhelming in small batches, so start with a pinch and taste.
- Upscaling (2x-4x): When making 60+ sandwiches, work in batches. Don't leave 30 slices of bread out on the counter at once; they will stale in 10 minutes. Assemble, wrap, and chill one loaf at a time.
| Original Ingredient | Substitute | Why It Works |
|---|---|---|
| Butter (0.5 cup) | Vegan Butter Block | High fat content maintains the moisture barrier. |
| Smoked Salmon | Marinated Carrots | Liquid smoke and sea salt give a similar profile. Note: Texture is softer. |
| Mayonnaise | Thick Greek Yogurt | Adds a tangier profile. Note: Increases moisture risk. |
Myths About Finger Sandwiches
Myth 1: You must remove the crusts before assembling. Actually, keeping the crusts on during the assembly and chilling process helps maintain the bread's shape. If you cut the crusts off first, the bread is more likely to distort when you apply the fillings.
The "Classic Method" of cutting after assembly gives you those sharp, professional looking corners.
Myth 2: Fresh baked bread is the best choice. Surprisingly, "day old" or slightly firm bread is often better for finger sandwiches. Super fresh bread is too soft and will compress into a doughy ball when you try to slice it. A high-quality store-bought Pullman loaf has the perfect density for this job.
Myth 3: You can't make them ahead of time. You can, but the method is specific. You must wrap the uncut sandwiches in damp paper towels, then in plastic wrap. This maintains the "fresh baked" moisture level of the bread while the "fat barrier" protects the interior from the filling.
Storage and Sustainability for Busy Cooks
Storage Guidelines - Fridge: Keep assembled sandwiches for up to 4 hours. Any longer and even the best butter barrier will eventually give way to the humidity of the fridge. - Freezer: Do not freeze assembled sandwiches.
The cucumber and mayo will separate and become unpalatable upon thawing. You can, however, freeze the bread slices if you have extras!
Zero Waste Tips Don't throw away those crusts! In an urban kitchen, we hate waste. Toss the crusts with a little olive oil, garlic powder, and dried herbs, then bake at 180°C for 10 minutes. You’ve just made gourmet croutons for your next salad.
Alternatively, blitz them in a food processor for fresh breadcrumbs to use in a binder for your next meal.
High Contrast Garnish and Plating Strategy
This is where the "urban and fresh" persona really shines. We want a color balance that looks like a high end catering spread. My strategy revolves around three specific color accents: Vibrant Green, Sunset Orange, and Golden Yellow.
- The Green Accent: Add the finely snipped chives to the egg salad and the dill sprigs to the cucumber sandwiches. This provides a "just picked" look that signals freshness. Add these at the very last second so they don't wilt.
- The Orange Accent: The smoked salmon is the star here. Contrast it against the dark pumpernickel bread. To make it pop further, add a tiny dot of cream cheese on top of each salmon finger to act as a "pedestal" for a single caper.
- The Yellow Accent: The curry powder in the egg salad provides a warm, urban glow. Enhance this by placing the egg sandwiches in the center of the platter, surrounded by the cooler greens and pinks of the other varieties.
When plating, avoid "crowding the canvas." Leave a little space between each finger so the individual layers are visible. This showcases your precision slicing and the beautiful "fat barrier" we worked so hard to build.
If you're serving these at a larger event, consider a tiered stand to add height to your table it’s a classic urban move that saves precious space for more appetizers!
Whether you’re serving these at a chic gallery opening or a simple Sunday brunch, remember that the secret is in the prep. Take your time with the butter, salt those cucumbers, and always, always use a sharp serrated knife. Happy assembly!

Recipe FAQs
What are some good finger sandwiches?
Cucumber and dill cream cheese, or smoked salmon with horseradish. These combinations offer the best balance of velvety spread against crisp, fresh textures.
What are little tiny sandwiches called?
They are called finger sandwiches. They are typically served crustless and cut into small, precise rectangles or triangles for easy handling at events.
What are the 5 most popular sandwich fillings combinations?
Cucumber/Dill, Egg Salad/Curry, Smoked Salmon/Caper, Curried Chicken Salad, and Roast Beef/Horseradish. These classic pairings provide the required color contrast and flavor complexity.
Can you make finger sandwiches the day before?
Yes, but only if assembled right before serving. Prepare all fillings and keep them chilled up to 24 hours, but assemble the final sandwiches no more than 4 hours ahead of time to prevent sogginess.
How do you stop cucumber finger sandwiches from making the bread soggy?
Apply a fat barrier, then salt and pat the cucumber dry. A thin layer of softened butter or cream cheese seals the bread, and salting the cucumber draws out excess water before assembly.
Is it true that day-old bread is better than fresh baked for finger sandwiches?
Yes, slightly stale or day-old bread is preferable. Super fresh bread is often too soft and compresses into a dense texture when you try to slice it precisely.
How to slice finger sandwiches for a professional look?
Use a sharp serrated knife, clean the blade between every cut, and chill the assembled sandwich first. Chilling firms up the layers, allowing the saw action of the knife to slice cleanly without smearing the filling.
Mini Finger Sandwiches Recipe

Ingredients:
Instructions:
Nutrition Facts:
| Calories | 187 kcal |
|---|---|
| Protein | 5.8 g |
| Fat | 7.9 g |
| Carbs | 23.5 g |
| Fiber | 1.4 g |
| Sugar | 2.2 g |
| Sodium | 382 mg |
