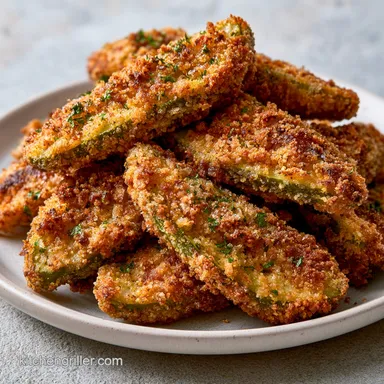
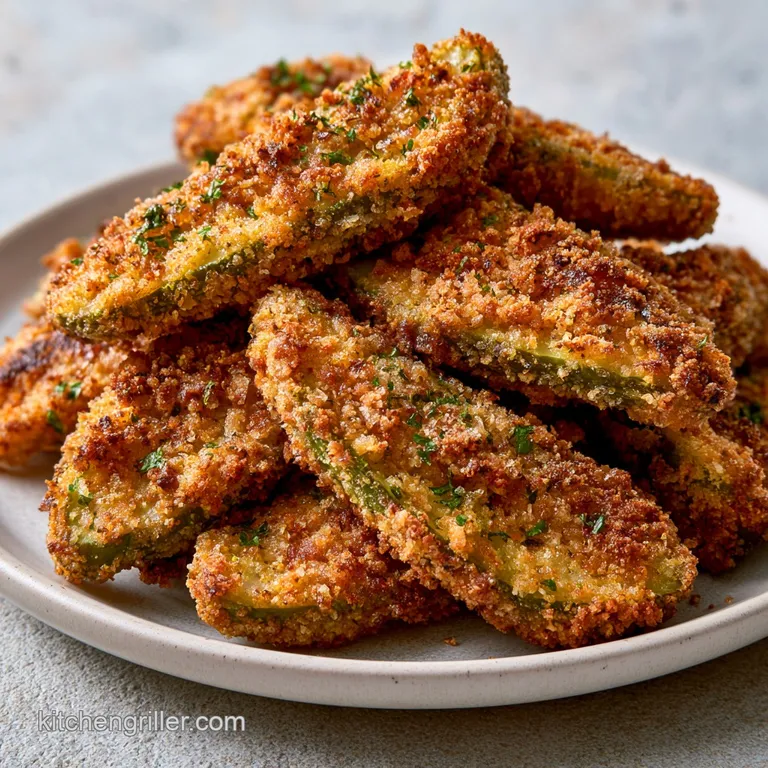
Fried Pickles: Ultra-Crispy Southern-Style Spears
- Time:15 minutes active + 10 minutes cook = Total 25 minutes
- Flavor/Texture Hook: Shatter crisp exterior with a tangy, velvety bite
- Perfect for: Game day snacks, urban dinner parties, or a vibrant appetizer
- The Secrets to Crispy Fried Pickles
- Why the Crunch Happens
- The Core Components
- Ingredient List and Swaps
- Step by Step Process
- Fixing Common Issues
- Troubleshooting Common Issues
- Adjusting the Batch Size
- Debunking Kitchen Myths
- Save and Reheat
- What to Serve Together
- High in Sodium
- Recipe FAQs
- 📝 Recipe Card
The Secrets to Crispy Fried Pickles
That first loud sizzle when the pickle hits the oil is the best part. It's an instant signal that you're about to get that specific, sharp tang of a dill pickle wrapped in a golden, salty crust. I remember the first time I tried making these in my city apartment, using a heavy cast iron pot on a small burner.
I didn't dry the pickles enough, and the breading just slid off into the oil like a wet blanket. It was a mess, but it taught me that moisture is the enemy of the crunch.
This dish is more than just a pub snack; it's a Southern tradition that has moved into the urban kitchen. The magic is in the tension between the acidity of the brine and the richness of the fry. When you get it right, the coating doesn't just sit there, it shatters.
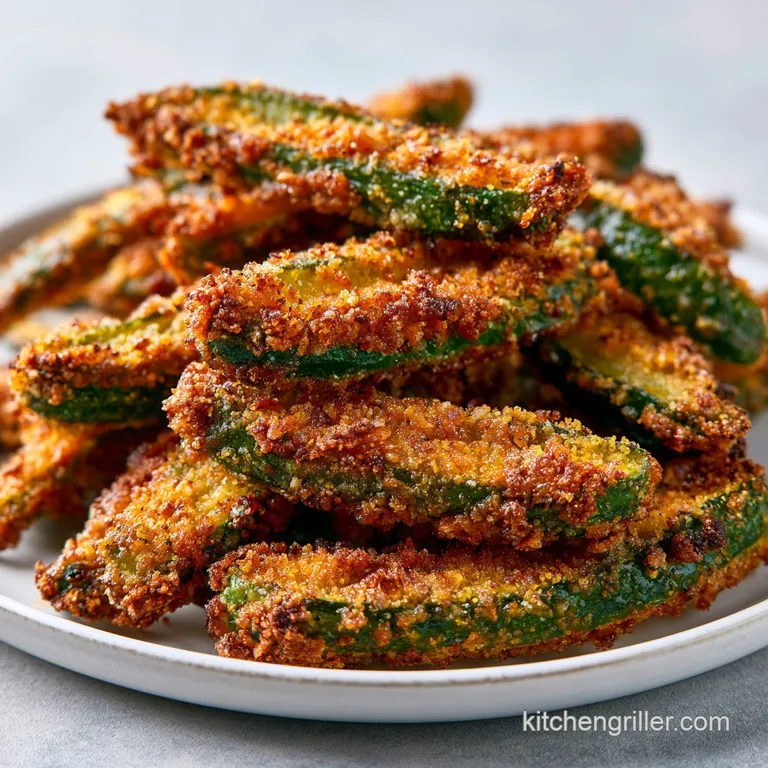
You want that deep mahogany gold color that looks vibrant on a platter and tastes even better.
We're going for a professional level crunch using a triple coat system. By layering seasoned flour, a tangy buttermilk batter, and a panko cornmeal blend, we build a wall that keeps the pickle juice inside and the oil outside.
Trust me on this, the extra few minutes of prepping the station makes the difference between a soggy spear and a masterpiece.
Why the Crunch Happens
- Moisture Barrier: Drying the pickles removes surface brine, which prevents the steam from pushing the breading away from the vegetable during frying.
- Protein Glue: The egg and buttermilk mixture creates a sticky protein layer that bonds the dry flour to the outer crumbs.
- Surface Area: Using Panko breadcrumbs instead of fine crumbs creates jagged edges, which increases the area that gets browned and crispy.
- Cornmeal Grit: The addition of cornmeal adds a distinct, sandy crunch that holds up longer than flour alone.
- Temperature Stability: Keeping the oil at exactly 190°C ensures the exterior sets instantly, preventing the pickle from absorbing too much fat.
| Method | Time | Texture | Best For |
|---|---|---|---|
| Stovetop Fry | 25 minutes | Shatter crisp | Maximum flavor and speed |
| Oven Baked | 40 minutes | Dry crunch | Lower fat, less effort |
| Air Fryer | 15 minutes | Light crisp | Small batches, healthier |
The choice between methods usually comes down to how much you value that specific oil fried taste. While the oven is easier, nothing beats the vibrant results of a cast iron pot. For those who want the most authentic experience, the stovetop is the only way to go.
The Core Components
| Ingredient | Science Role | Pro Secret |
|---|---|---|
| Cornmeal | Structural Crunch | Use yellow cornmeal for a vibrant, golden color |
| Buttermilk | Acidic Tenderizer | Adds a subtle tang that complements the vinegar |
| Panko | Volume & Air | Shake off excess to avoid "clumping" in the oil |
| Dill Pickles | Acidic Core | Pat them dry until they feel almost tacky |
When choosing your pickles, avoid the "bread and butter" variety if you want that classic salty kick. Stick to dill spears. According to Serious Eats, maintaining a consistent oil temperature is the most critical factor in deep frying to avoid greasiness. If the oil drops too low, the breading absorbs the fat instead of repelling it.
Ingredient List and Swaps
For the Pickles 1 lb (450g) Dill pickle spears, patted dry Why this? Spears provide a better handle and bite than chips Substitute: Gherkins. Note: Smaller size means faster cook time.
- Substitute
- gluten-free flour. Note: Slightly grainier texture.
- Substitute
- Polenta. Note: Coarser grain, more "pop".
- Substitute
- Onion powder. Note: Sweeter, less pungent flavor.
- Substitute
- Smoked paprika. Note: Adds a woody, outdoor flavor.
- Substitute
- Celery salt. Note: Adds a classic deli vibe.
- Substitute
- Flax egg. Note: Breading may be less secure.
- Substitute
- Plain yogurt. Note: Denser batter, may need a splash of water.
- Substitute
- Cayenne pepper. Note: Pure heat without the vinegar.
For the Final Crunch 1 cup (60g) Panko breadcrumbs Why this? Creates a lightweight, airy crust Substitute: Standard breadcrumbs. Note: Much denser, less "shatter".
1/2 cup (40g) Yellow cornmeal Why this? Reinforces the exterior structure Substitute: Crushed cornflakes. Note: Very crunchy, but browns faster.
For Frying 3 cups (710ml) Vegetable oil Why this? Neutral flavor with a high smoke point Substitute: Peanut oil. Note: Higher smoke point, slightly nuttier.
Right then, once you have your station set, you're ready to move. The key here is speed. You don't want the batter to sit and soak into the flour for too long, or you'll end up with a doughy coating.
Step by step Process
Phase 1: The Moisture Purge
- Line a plate with paper towels and lay the pickle spears across them. Press firmly with another paper towel to remove all surface brine. Note: This prevents the breading from steaming off during the fry.
Phase 2: The Triple Dredge Station
- Prepare the triple dredge station. In the first bowl, mix all purpose flour, 1/4 cup cornmeal, garlic powder, paprika, pepper, and salt.
- In the second bowl, whisk eggs, buttermilk, and hot sauce until smooth.
- In the third bowl, combine Panko breadcrumbs and 1/2 cup cornmeal. Note: Mixing the cornmeal into the Panko ensures the grit is evenly distributed.
- Toss each pickle spear in the seasoned flour mixture, shaking off any excess.
- Dip the floured spear completely into the egg batter, then press firmly into the Panko cornmeal mixture until fully coated. Note: Really press the crumbs in so they adhere to the batter.
Phase 3: The Golden Fry
- Heat vegetable oil in a heavy bottomed pot to 375°F (190°C). Note: Use a thermometer to be precise; guessing leads to oily pickles.
- Carefully lower 4-5 spears into the oil. Fry for 2-3 minutes, turning once, until the coating is a deep mahogany gold.
- Remove spears and place on a wire cooling rack for at least 60 seconds before moving to a serving platter. Note: A rack prevents the bottom from steaming and becoming soggy.
If you're feeling fancy, you can serve these alongside some Homemade Pretzel Bites for a full on appetizer spread. The salty, chewy pretzels balance the sharp, crispy nature of the Fried Pickles perfectly.
Fixing Common Issues
Troubleshooting Common Issues
| Issue | Solution |
|---|---|
| Breading falling off | This is usually a moisture problem. If the pickle was still wet or the flour layer was too thick, the batter can't grip the surface. Ensure you pat them dry and shake off the excess flour before the e |
| Why are my pickles too oily | Your oil temperature likely dropped. This happens if you crowd the pan or if your burner isn't powerful enough. Only fry 4-5 spears at a time and wait for the oil to return to 190°C between batches. |
| Why is the crust pale | Either the oil wasn't hot enough or you're using a flour with too much starch. Ensure your oil is at the correct temp and that you've included the cornmeal for that vibrant gold color. |
Common Mistakes Checklist
- ✓ Did you pat the pickles dry?
- ✓ Is the oil exactly 190°C?
- ✓ Did you avoid crowding the pot?
- ✓ Are you using a wire rack for cooling?
- ✓ Did you press the Panko firmly into the batter?
Adjusting the Batch Size
When you're making Fried Pickles for a crowd, you can't just multiply everything linearly and expect the same result. The physics of the frying pot change when you have more volume.
Scaling Down (Half Batch) For a smaller snack, use half the ingredients. However, don't halve the oil. You still need enough depth in the pot to ensure the pickles are submerged. Beat one egg in a small bowl and use half of it to keep the ratios correct.
Reduce the total fry time by about 20% if the spears are thinner.
Scaling Up (Double or Quadruple Batch) When doubling the recipe, only increase the salt and spices to 1.5x. Over seasoning the dredge can lead to a metallic taste when the spices concentrate during frying. Work in batches of 4-5 spears.
If you try to do 15 at once, the oil temperature will plummet, and your Fried Pickles will be greasy.
For those who love the crunch of a fry but want something different, these pair well with Fried Catfish as a side dish. Both use similar frying techniques but offer totally different flavor profiles.
Debunking Kitchen Myths
Myth: Air frying gives the same result. Truth: It doesn't. While air frying is healthier, it can't replicate the "shatter" of oil fried breading. The oil penetrates the cornmeal and Panko in a way that creates a velvety, rich interior and a crisp shell that air cannot match.
Myth: You should soak pickles in water first. Truth: Absolutely not. The goal with Fried Pickles is to remove as much surface moisture as possible. Adding more water just creates a steam barrier that pushes the breading off the pickle during the fry.
Myth: Using only flour is enough. Truth: Flour alone creates a soft, doughy crust. Adding cornmeal and Panko provides the structural integrity needed for a professional grade crunch.
Save and Reheat
Storage Guidelines Fresh Fried Pickles are best eaten immediately. However, if you have leftovers, store them in a single layer on a tray in the fridge for up to 2 days. Don't stack them in a container, or the trapped steam will turn them into a soggy mess.
Reheating for the Crunch Never use a microwave to reheat these. It will make them rubbery. Instead, pop them in a 200°C oven for 5-7 minutes or an air fryer for 3 minutes. This restores the mahogany gold color and the shatter crisp texture.
Zero Waste Tips Don't throw away the leftover buttermilk batter. You can add a bit more flour and a pinch of sugar to turn it into a quick pancake batter for the next morning. As for the frying oil, if it's not burnt, filter it through a coffee filter and store it in a glass jar for one more use.
What to Serve Together
To make these Fried Pickles truly pop, you need a dip that balances the acidity. A spicy remoulade or a cool ranch dressing is the classic choice. For something more urban and fresh, try a sriracha infused aioli.
The Menu Match If you're hosting a party, these work as a vibrant starter. They provide a sharp, salty contrast to richer foods. I love serving them alongside something cheesy or beefy to balance the vinegar.
Decision Shortcut If you want maximum crunch, use the triple dredge and a cast iron pot. If you're short on time, use pickle chips instead of spears. If you want a spicy kick, add a dash of cayenne to the seasoned flour.
Finally, remember that Fried Pickles are all about the experience. The sound of the crunch, the smell of the cornmeal, and the zing of the dill. Once you've mastered the triple dredge, you'll never go back to the store-bought frozen versions. Let's crack on and get frying!
High in Sodium
910 mg 910 mg of sodium per serving (40% 40% of daily value)
The American Heart Association recommends a limit of 2,300mg of sodium per day for most adults to maintain heart health.
Tips to Reduce Sodium
-
Rinse Your Pickles-30%
Thoroughly rinse the dill pickle spears under cold water before patting them dry to remove excess surface brine.
-
Omit Added Salt-25%
Since pickles and hot sauce are already salty, completely remove the 1/4 tsp of salt from the flour mixture.
-
Swap the Hot Sauce-20%
Replace the hot sauce with fresh minced chili peppers or a low-sodium hot sauce alternative.
-
Use Unsalted Panko-15%
Choose unsalted Panko breadcrumbs or make your own at home to avoid the hidden sodium in processed crumbs.
-
Enhance with Herbs
Add freshly chopped dill or a pinch more smoked paprika to increase flavor depth without adding sodium.
Recipe FAQs
Why is my breading falling off?
Ensure pickles are completely dry. Surface brine prevents the flour from gripping, so pat spears firmly with paper towels before dredging.
Why are my fried pickles too oily?
Maintain a steady oil temperature of 375°F (190°C). Avoid crowding the pot by frying only 4-5 spears at a time to prevent the temperature from dropping.
How to avoid a pale crust?
Heat the vegetable oil to exactly 375°F (190°C) before frying. Low temperatures prevent the Panko and cornmeal from caramelizing into a deep mahogany gold.
Is it true I can skip drying the pickles to save time?
No, this is a common misconception. Excess moisture creates steam between the pickle and the batter, which causes the coating to slide off during frying.
How to keep the pickles from getting soggy?
Place fried spears on a wire cooling rack for 60 seconds. This allows air to circulate and prevents steam from softening the bottom of the crust.
Can I use a different oil for frying?
Yes, any neutral oil with a high smoke point works. If you enjoyed this frying technique, see how the same principle works in our southern hush puppies.
How to reheat fried pickles without losing crispness?
Use an oven or air fryer at 350°F. Microwaves will make the breading soggy, whereas dry heat restores the mahogany gold crunch.
Crispy Fried Pickles