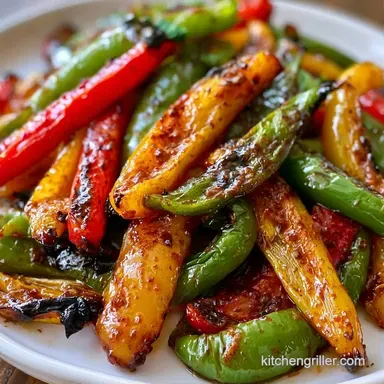
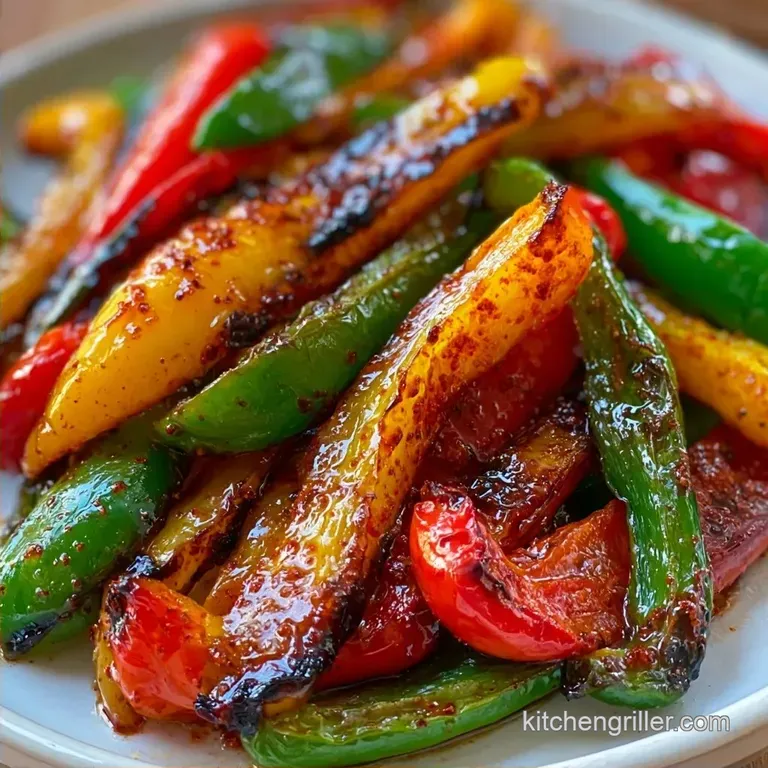
Sweet and Smoky Grilled Peppers in 15 Minutes
- Time: 5 min active + 10 min cook
- Flavor/Texture Hook: Glossy, charred skins with a maple smoke finish
- Perfect for: Side dish for BBQ, vegan appetizers, or meal prep
Sweet and Smoky Grilled Peppers
The sound of a hot grill basket hitting the grates is the only way to start this. You want that immediate sizzle, the kind that tells you the heat is exactly where it needs to be. I remember the first time I tried to do this on a low flame, thinking I was being "gentle" with the vegetables.
All I got were steamed, limp strips that tasted like nothing. It was a lesson in heat management.
You need a over high heat environment to get that distinct bark on the outside while keeping the inside just tender. When the maple syrup hits the hot pepper skins, it bubbles and darkens in seconds, creating a lacquer that tastes like a professional smokehouse.
This recipe isn't about long hours. While I usually prefer a low and slow approach for my brisket, these peppers require a hot and fast strike. You'll get a mahogany color and a deep, smoky aroma that makes them the standout part of any spread.
The Truth About Charring Peppers
Getting a proper char isn't about luck, it's about moisture control. If your peppers are too wet when they hit the grill, they'll steam instead of sear. I've seen too many people throw pre washed, dripping peppers onto the heat. That's a one way ticket to mushy veg.
The goal here is to create a barrier of oil that conducts heat efficiently into the skin. This helps the skin blister and peel away slightly, allowing the glaze to penetrate the flesh. If the heat is too low, the cells in the pepper break down slowly, leaking water and ruining the texture.
Many folks think they need to grill peppers whole and peel them. That works for roasted red peppers, but for a side dish, slicing them into 1 inch strips is better. It increases the surface area for the glaze to cling to, giving you more flavor in every bite.
The Heat Factor: Sugar in the maple syrup caramelizes at high temperatures, which binds the smoked paprika to the pepper. This creates a thin, flavorful crust that resists the natural juices of the vegetable.
| Method | Time | Texture | Best For |
|---|---|---|---|
| Grill Basket | 10 mins | Charred & Firm | High smoke flavor |
| Stovetop Pan | 12 mins | Sautéed | Indoor convenience |
| Oven Roast | 20 mins | Soft & Sweet | Large batch prep |
What Makes the Flavor
Each ingredient here has a technical job. We aren't just tossing things in a bowl; we're building a flavor profile that mimics a long smoke session in a fraction of the time.
| Ingredient | What It Does | Best Swap |
|---|---|---|
| Maple Syrup | Provides sugar for caramelization | Honey (slightly floral) |
| Smoked Paprika | Adds the "pit" flavor without a smoker | Chipotle powder (adds heat) |
| Apple Cider Vinegar | Cuts through the sugar with acidity | Lemon juice (brighter) |
| Olive Oil | Conducts heat and prevents sticking | Avocado oil (higher smoke point) |
The acidity from the vinegar is a non negotiable. Without it, the maple syrup makes the peppers taste like candy. The vinegar balances the sweetness and helps the flavors "pop" against the charred notes of the grill. According to Serious Eats, balancing acidity and sugar is the key to making grilled vegetables taste professional.
The Essential Grill Gear
You don't need a fancy setup, but a grill basket is a lifesaver. Trying to grill sliced pepper strips directly on the grates is a nightmare. They fall through the gaps or slide around, leading to uneven char. A basket lets you shake the peppers, ensuring every side hits the heat.
If you don't have a basket, a heavy duty foil packet works, though you lose some of the direct fire contact. The most important tool is a silicone brush. It allows you to apply the glaze in the final moments without scraping the charred bits off the skins.
I also suggest a meat thermometer for your grill surface. You're looking for medium high heat, usually around 400°F (200°C). If the grate is too cold, you'll just be boiling your peppers in oil.
The Cooking Process

Right then, let's get into the actual work. Keep your glaze ready in a small bowl before the peppers hit the heat, because once they start charring, things move fast.
Seasoning the Peppers
Toss the sliced peppers in a large bowl with the olive oil, salt, and pepper until every strip is evenly coated. Note: The oil prevents the skins from sticking to the metal basket.
The Initial Sear
Preheat the grill to medium high. Place the peppers in a grill basket and grill for 4–6 minutes, shaking occasionally, until edges soften and skins develop charred blisters.
Finishing with Glaze
Whisk together the maple syrup, smoked paprika, apple cider vinegar, and garlic powder in a small bowl. Apply the glaze using a brush or tongs during the final 2 minutes of grilling until the coating is glossy and mahogany colored. Remove from heat once tender.
Chef's Note: Don't apply the glaze at the beginning. The sugar in the maple syrup will burn and turn bitter before the peppers are actually cooked through.
Preventing Grilled Pepper Failures
Most mistakes with this dish come down to timing and temperature. If you leave the peppers on too long, you lose the structural integrity of the vegetable. You want a "snap" to the bite, not a puree.
Glaze Burning Issues
If your glaze turns black instead of mahogany, your heat is too high or you applied it too early. The sugar in the syrup reaches its burning point quickly. If this happens, pull the peppers off immediately and add a squeeze of fresh lime to cut the bitterness.
Mushy Texture Causes
Mushiness happens when the internal temperature rises too slowly. Instead of a quick sear, the peppers slowly steam in their own juices. Use a grill basket and ensure your grill is preheated for at least 10 minutes before adding the veg.
Skin Sticking Problems
If the peppers are tearing when you shake the basket, you didn't use enough oil. The oil creates a hydrophobic barrier between the pepper skin and the metal.
| Problem | Root Cause | Solution |
|---|---|---|
| Mushy peppers | Too much time/low heat | Increase heat, reduce cook time |
| Burnt glaze | Heat too high | Apply glaze in the last 2 mins |
| Sticking skins | Insufficient oil | Toss thoroughly in 2 tbsp oil |
Swapping Ingredients for Diet
This recipe is naturally vegan and gluten-free, but you can tweak it depending on your needs. If you're avoiding refined sugars or maple syrup, you can use a small amount of agave or even a dash of date syrup.
For those on a Paleo diet, maple syrup is usually fine, but you can swap it for a bit of mashed ripe banana or a honey substitute for a different kind of sweetness. If you want a spicy kick, replace the smoked paprika with chipotle powder. This gives you a deep, earthy heat that pairs great with outdoor grilled vegetables.
If you're watching your sodium, you can omit the salt and add an extra teaspoon of apple cider vinegar. The acidity mimics the "brightness" that salt usually provides.
Keeping Leftovers Fresh
Grilled peppers hold up surprisingly well in the fridge. Store them in an airtight glass container for up to 4 days. The flavors actually meld and deepen as they sit, making them a great cold addition to salads.
For freezing, I don't recommend it. The cell walls of the pepper break down during the freezing process, and when you thaw them, they become watery and limp. It ruins the texture we worked so hard to get.
To reheat, avoid the microwave if possible. It will make them mushy. Instead, toss them in a hot skillet for 2-3 minutes or throw them back on the grill for 60 seconds. This brings back that charred aroma and firms up the skin.
Regarding waste, don't toss the pepper stems. I throw mine into a freezer bag with other veggie scraps to make a home-made stock. The stems actually hold a lot of the aromatic compounds of the pepper.
Best Ways to Serve
These Sweet and Smoky Grilled Peppers are versatile. They work as a standalone side, but they're even better as a component of a larger meal.
If you're doing a full BBQ spread, these go great with some grilled corn. The smokiness of the peppers complements the sweetness of the corn perfectly. You can also pile these on top of a grilled burger or a piece of grilled salmon for an instant flavor boost.
For a more refined appetizer, serve them over a dollop of whipped goat cheese or feta. The tanginess of the cheese cuts through the maple glaze, creating a balanced bite. Just make sure the peppers are slightly warm when you place them on the cheese so the fats soften.
Common Misconceptions
Searing vegetables doesn't "lock in" nutrients or flavor. That's an old myth. The high heat actually breaks down some vitamins, but it creates new flavor compounds through browning. We sear for the taste, not to preserve the inside.
Another myth is that you need a charcoal grill to get "real" smoky flavor. While charcoal adds a specific aroma, a high-quality smoked paprika combined with a hot gas grill gets you 90% of the way there. The glaze does most of the heavy lifting here.
Recipe FAQs
How to grill sweet peppers on the barbecue?
Toss sliced peppers in olive oil, salt, and pepper. Grill them over medium high heat in a basket for 4 6 minutes until the edges soften and skins develop charred blisters.
How to get smoky flavor on bell peppers?
Whisk smoked paprika into a glaze with maple syrup and apple cider vinegar. Apply this mixture during the final 2 minutes of grilling to create a glossy, mahogany colored finish.
Do you prefer direct or indirect grilling for vegetables?
Direct heat is best. A fast sear prevents the peppers from turning into mush and creates the distinct charred bark needed for a professional smokehouse taste.
How to roast summer vegetables on your BBQ grill?
Use a grill basket to maintain high heat contact. Grill for roughly 5 minutes, shaking occasionally to ensure an even char across all sides of the vegetables.
How to grill peppers without them falling through the grates?
Place the pepper strips inside a grill basket. This keeps the sliced pieces contained while allowing you to shake the basket for uniform cooking.
Is it true that low heat is better for grilling vegetables?
No, this is a common misconception. Low heat steams the vegetables, resulting in limp strips; medium high heat is necessary to achieve the proper sizzle and char.
Can I use these peppers for meal prep?
Yes, they store well. If you enjoyed mastering the fast sear technique here, see how the same principle works in our grilled veggie meal prep.
Sweet And Smoky Grilled Peppers