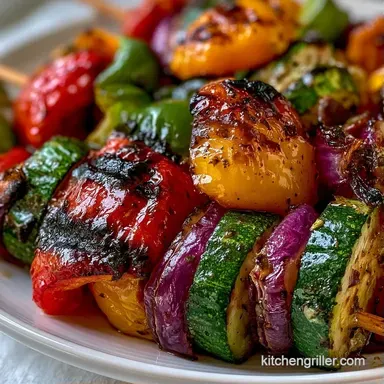
Grilled Pepper and Onion Skewers with Zucchini
- Time: 10 min active + 10 min cooking
- Flavor/Texture Hook: Charred, smoky edges with a bright citrus snap
- Perfect for: Vibrant urban dinners or a fresh side for city hosting
Grilled Pepper and Onion Skewers
The smell of charring peppers and sweet onions hitting a hot cast iron pan is one of my favorite things about indoor grilling. This dish feels like a trip to a Mediterranean street market, where the air is thick with the scent of oregano and olive oil.
In many coastal cultures, these vegetable kabobs aren't just a side dish, they're a way to celebrate the peak of the harvest.
I used to think you needed a massive outdoor grill to get that authentic sear, but that's just not true. You can get the same vibrant results right in your apartment using a heavy grill pan. It's all about the heat and the way the vegetables caramelize.
You'll find these Grilled Pepper and Onion Skewers are surprisingly fast to put together. They bring a bright, colorful energy to the table that makes any meal feel a bit more special without requiring hours of prep work.
Why Most Recipes Fail
Most people overcook their vegetables, turning a crisp pepper into something mushy. The trick is high heat and short cook times.
- High Heat: Fast searing creates those dark, caramelized edges without cooking the center into mush.
- Acid Balance: A splash of lemon juice breaks down the surface tension, helping the spices stick and brightening the heavy oil.
- Spacing: Leaving gaps between the vegetables allows the heat to hit every side, preventing the "steamed" effect.
| Method | Time | Texture | Best For |
|---|---|---|---|
| Grill Pan | 10 min | High char, crisp | Urban kitchens |
| Oven | 20 min | Soft, roasted | Large batches |
| Air Fryer | 12 min | Slightly dried, tender | Single servings |
Necessary Ingredients and Gear
What Each Ingredient Does
| Ingredient | What It Does | Best Swap |
|---|---|---|
| Bell Peppers | Adds sweetness and color | Mini sweet peppers |
| Red Onion | Provides savory depth | Shallots (cut thick) |
| Zucchini | Adds a mild, fresh base | Yellow squash |
| Lemon Juice | Brightens flavors | Lime juice |
The Shopping List
- 12 oz bell peppers, cut into 1 inch chunks Why this? Thick cuts prevent burning
- 10 oz red onions, cut into 1 inch chunks Why this? Red onions hold their shape better than yellow
- 8 oz zucchini, sliced into thick rounds Why this? Rounds provide a steady base on the skewer
- 2 tbsp extra virgin olive oil Why this? High smoke point and classic flavor
- 1 tbsp fresh lemon juice Why this? Cuts through the oil richness
- 2 cloves garlic, minced
- 1 tsp dried oregano
- ½ tsp sea salt
- ¼ tsp cracked black pepper
Tool Kit
For this recipe, a cast iron grill pan is the way to go. It retains heat better than aluminum, which means your vegetables brown faster. You'll also need 8 bamboo or metal skewers. If using bamboo, soak them in water for 10 minutes first so they don't catch fire on the pan.
Grilling Steps in Detail
Phase 1: Prep and Coat
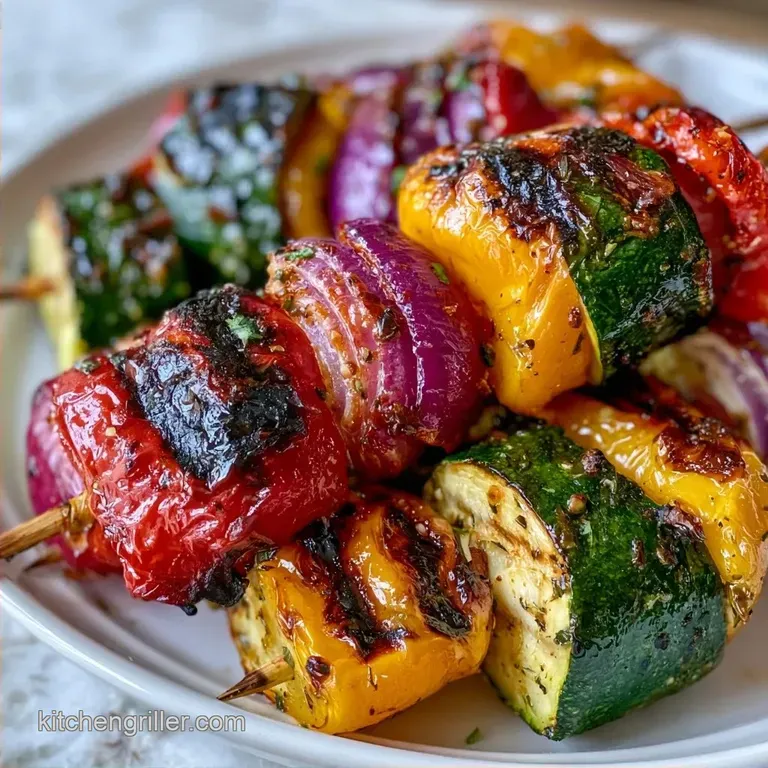
- Toss the bell peppers, red onions, and zucchini in a large mixing bowl.
- Drizzle the olive oil and lemon juice over the vegetables.
- Sprinkle in the minced garlic, oregano, salt, and pepper.
- Mix gently until every piece is coated. Note: Over mixing can bruise the zucchini
- Let the mixture sit for 5 minutes. This allows the salt to draw out a bit of moisture for better browning.
Phase 2: Threading the Kabobs
- Slide the vegetables onto skewers, alternating pepper, onion, and zucchini.
- Leave small gaps between each piece. Note: Touching vegetables steam instead of sear
- Ensure the vegetables are pushed firmly against each other but not crushed.
Phase 3: Grilling to Perfection
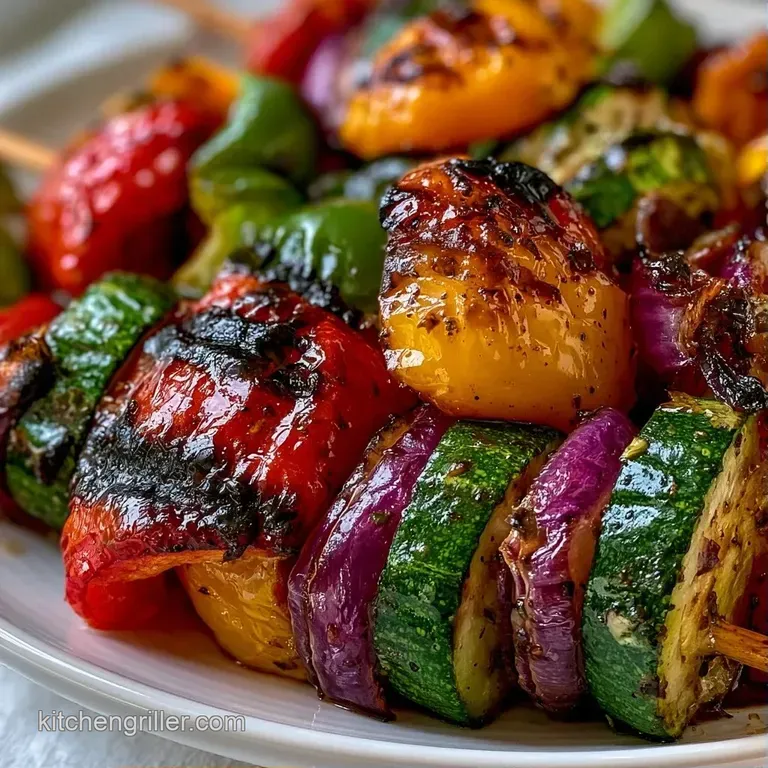
- Preheat the grill pan to medium high heat. Wait until a drop of water flicked onto the pan dances and evaporates instantly.
- Lightly oil the grate with a paper towel soaked in oil to prevent sticking.
- Place skewers on the grill and cook 3-4 minutes per side. Cook until charred edges develop and the onion looks translucent.
Tips and Common Pitfalls
Why Your Peppers Are Mushy
Mushy vegetables usually happen because the pan wasn't hot enough or the pan was overcrowded. When you crowd the pan, the moisture released from the vegetables has nowhere to go, so they boil in their own juices.
To Prevent Bamboo Burn
If you're using wooden skewers, the ends can blacken or ignite. Soaking them is standard, but for an urban kitchen, you can also wrap the exposed ends in a small piece of foil.
For Uniform Charring
Make sure your chunks are truly 1 inch. If the onion is huge and the pepper is small, the pepper will burn before the onion softens.
| Problem | Root Cause | Solution |
|---|---|---|
| Sticking | Pan not hot enough | Increase heat before adding oil |
| Burnt Garlic | Garlic minced too fine | Use larger garlic slices |
| Raw Centers | Low heat/Long time | Use medium high heat; cook faster |
Customizing Your Skewers
If you want to change the vibe, you can easily swap the herbs. Dried thyme or rosemary works great for a more woody, earthy flavor. For those who like heat, a pinch of red pepper flakes in the marinade adds a nice kick.
If you're looking for more variety, you can try my Easy Grilled Veggies for a larger platter of mixed greens. Another great twist is adding a splash of balsamic glaze after the skewers come off the heat. This adds a sweet, tangy finish that pairs well with the charred onion.
Decision Shortcut:
- If you want a smoky flavor, use a cast iron pan.
- If you want a softer texture, use the oven at 400°F (200°C).
- If you're in a rush, use the air fryer at 380°F (190°C).
Make-ahead and Leftover Tips
You can chop all the vegetables and store them in a container for up to 24 hours. However, don't add the salt or lemon juice until you're ready to grill. Salt draws out water, and if they sit too long, the vegetables will get soggy before they even hit the pan.
Storage: Store cooked skewers in an airtight container in the fridge for 3 days. They're actually great cold in a salad.
Freezing: I don't recommend freezing these. The zucchini becomes watery and loses its structure once thawed.
Zero Waste: Don't toss the pepper seeds or the onion skins. Put them in a freezer bag with other veggie scraps. Once the bag is full, simmer them with water to make a quick vegetable stock for your next soup.
Great Pairing Suggestions
These skewers are a fantastic side for protein heavy mains. They provide a fresh, acidic contrast to rich meats. I often serve them alongside Garlic Butter Grilled Shrimp for a light, urban style dinner.
If you want something more filling, serve them over a bed of quinoa or farro. A dollop of tzatziki or a side of hummus makes this a complete Mediterranean meal.
Plating Levels
How you present these depends on who's coming over. A casual Tuesday night is different from a Saturday dinner party.
- Simple: Pile the skewers on a large white plate and drizzle with a bit of extra lemon juice.
- Polished: Arrange them on a dark wooden board with fresh parsley scattered around and lemon wedges on the side.
- Restaurant: Stack three skewers vertically on a small rectangular plate, topped with a swirl of Greek yogurt and a sprinkle of sumac.
| Plating Level | Key Element | Vibe |
|---|---|---|
| Simple | White Plate | Homey |
| Polished | Wooden Board | Chic |
| Restaurant | Vertical Stack | High End |
Debunking Veggie Myths
Some people say you have to peel the zucchini. Honestly, don't even bother. The skin holds the skewer together and contains most of the nutrients.
Another myth is that you need to "seal" the vegetables by searing them. Like with meat, searing doesn't lock in nutrients. It just adds a layer of flavor through browning. According to Serious Eats, the goal of over high heat cooking is flavor development, not moisture preservation.
Finally, some believe that olive oil can't be used for grilling because it burns too fast. While it has a lower smoke point than canola, extra virgin olive oil is fine for medium high heat and adds a flavor that's worth the trade off.
Recipe FAQs
How long to grill onion and pepper kabobs?
Cook for 3 4 minutes per side. Use medium high heat to ensure you get a nice char without overcooking the centers.
Should I wet my skewers before grilling?
Yes, soak wooden skewers for 30 minutes. This simple step prevents the wood from scorching or catching fire during grilling.
Do you marinate peppers for kabobs?
Yes, toss them in oil, lemon juice, and herbs. A quick 5-minute marination helps the flavors penetrate and prevents the vegetables from sticking to the grate.
Are grilled peppers good for diabetics?
Yes, they are an excellent option. Because they are low-calorie and low-glycemic, they are a safe and healthy choice for blood sugar management.
Do you prefer direct or indirect grilling for vegetables?
Direct grilling is the best method. Using high, direct heat allows the vegetables to caramelize and develop smoky edges quickly.
How to grill peppers and onions?
Preheat the grill to medium high heat. Oil the grate lightly, then cook the vegetable skewers for 3-4 minutes per side.
What are some of the best grilled vegetable recipes?
These charred skewers are a fantastic option. Their bright, zesty flavor profiles provide a great contrast to smoky meats like our Traeger ribs.
Grilled Pepper And Onion Skewers